Lab 1
Before starting the lab, please complete the setup.
Introduction
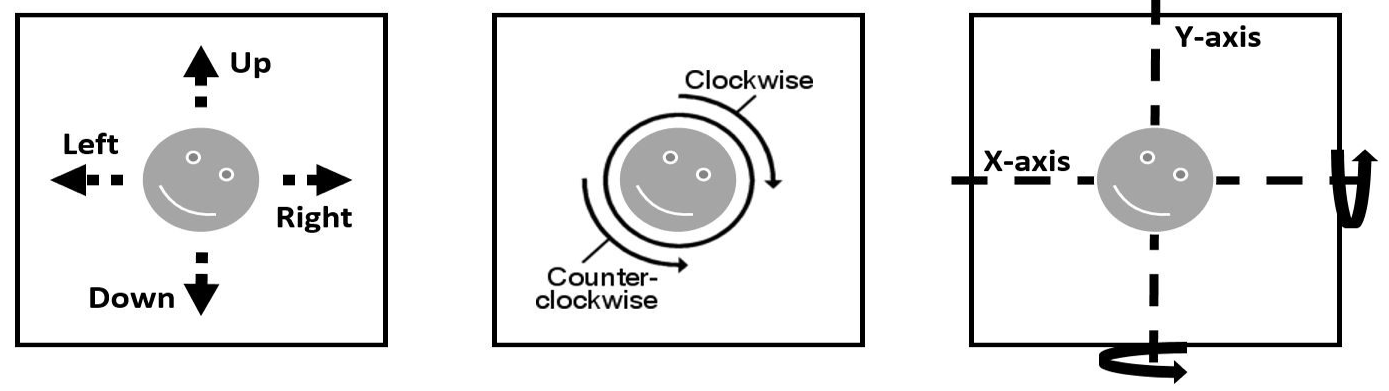
Upon graduating from Skule, and having become a high-performance program-optimizing guru, you decided to open your own high-performance code optimization consulting firm. After great success with your previous client, you have a second client: a virtual reality headset startup. The startup is co-founded by a group of hardware geeks, who like to design electrical circuits and integrate sensors. The VR headset prototype hardware is almost ready but lacks a high-performance software image rendering engine. The hardware engineers have already written functionally correct code in C, but want your help to supercharge software performance and efficiency. The rendering engine’s input is a preprocessed time-series data set representing a list of object manipulation actions. Each action is consecutively applied over a 2D object in a bitmap image such that the object appears to move with reference to the viewer. To generate smooth and realistic visual animations, sensor data points are oversampled at 1500Hz or 25x normal screen refresh rate (60 frames/s). The image below shows all the possible object manipulation actions. The goal of the rendering engine is to process all the basic object manipulation actions and output rendered images for the display at 60 frames/s.
Procedure
For this lab, please answer all questions on Crowdmark with a few bullet points or short sentences. You may collect performance measurements on your machine or the UG machines.
Source Code
If you've followed the setup, all the code for this lab is in the lab2
directory (yes, Lab 1 is profiling Lab 2).
Build and Test
The lab assignment utilizes the open-source cross-platform CMake packaging system to manage the source code. Unlike the simple projects you have seen before, we use Meson to generate the build files. Below are the instructions to compile the project:
cd lab2 # Navigate to the lab assignment directory you extracted
meson setup build # Make a new directory called build for all the build files
meson compile -C build # Compile everything to create the executable
The executable will be in build/lab2.
When you run the binary using the command below, you should receive output that
is similar to the output shown below.
build/lab2 -g -f lab1.csv -i lab1.bmp
Loading input sensor input from file: ../lab1.csv
Loading initial 2D object bmp image from file: ../lab1.bmp
************************************************************************************
Performance Results:
Number of cpu cycles consumed by the reference implementation: 33492345978
Number of cpu cycles consumed by your implementation: 33170344755
Optimization Speedup Ratio (nearest integer): 1
************************************************************************************
Tip: You will be investigating and profiling Lab 2’s source code in Lab 1. You will not be modifying this source code in Lab 1 thus not required to understand what the code is doing exactly. However, it may be a good idea to use this opportunity to explore around and think about how you can optimize this code in Lab 2 while you work on Lab 1.
Measuring Compilation Time
In this assignment, you will use /usr/bin/time to measure compilation and
performance.
In the output, note that the number that ends in "user" is the runtime in
seconds for "user-mode".
This is the time you should use in this report, except measuring program size.
Note that since you are measuring performance in a real system, measurements
are a little different each time due to system variability.
Try to measure on an unloaded machine.
For every timing measurement always do 5 runs and average them (please only
report the final average).
To build the gprof version, use the flags: -g -pg
To build the gcov version, use the flags: -g --coverage
Measure compilation times using the:
- gprof
- gcov
-g-O2-O3-Oscompilation flags.
Between runs it's easiest to simply delete the build directory using
rm -rf build, and then run meson setup with any arguments you wish.
Note: We have intentionally left out the details on how to add compiler flags to
Meson to encourage you to practice reading and researching Meson's
documentation.
Q2-5 on Crowdmark.
Measuring Program Size
Use ls -l to measure the size of each version of the binary from the previous
section.
Q6-9 on Crowdmark.
Measuring Performance
Measure the run-time of all six versions compiled in the previous section.
Q10-13 on Crowdmark.
Profiling with gprof
Compile gprof support for the -g, -O2, and -O3 versions, by using flags
-g -pg, -O2 -pg, and -O3 -pg respectively; run each of these versions to
collect the gprof results; you don’t have to time any of these experiments.
Q14-15 on Crowdmark.
Inspect Assembly
Use objdump to list the assembly for the -g and -O3 versions (e.g., run
objdump -d build/lab2.p/implementation.c.o to examine the assembly
instructions for the file implementation.c).
Q16 on Crowdmark.
Profiling with gcov
Use gcov to get the per-line execution counts of the "number-one" function from
the -O3 version (but use the -g version to gather the gcov profile).
After running the gcov version, execute the gcov program to generate a profile
of the appropriate file (e.g., run gcov -o build/lab2.p/ -b main.c to profile the file
main.c).
Running gcov will create main.c.gcov (for main.c).
Note: if you run the gcov program multiple times it will add to the counts in
main.c.gcov; you have to remove the .gcda and .gcno files in
build/lab2.p/ to start counting from zero.
Q17 on Crowdmark.
Submission
Please answer all questions on Crowdmark, you do not have to modify any code for this Lab.
Common Issues
Segfault when Running
Likely you didn't have git-lfs installed when you cloned. Check the filesize
of lab1.bmp. If it's small try running git lfs fetch && git lfs checkout
in your devcontainer.
Unable to Fetch, Pull, or Push from the Dev Container
You need to have an SSH Agent, there's a guide on GitHub. You're free to set it up any way you wish, just make sure that
the SSH_AUTH_SOCK environment is set. I personally use the SSH Agent provided
by 1Password that you can get for for free.
Using UG Machines
You'll have to install the build tools, you can do the following:
python3 -m venv venv
source venv/bin/activate
pip install -U pip
pip install meson ninja
You'll also need to switch the C/C++ standard to the latest supported version on the machines.