Lab 0
Welcome to APS105! You'll be using GitHub to develop and submit your labs during the semester. Your submission results run automatically on submission are available on CompEng.gg.
Setting Up Your Accounts
First, complete the following steps:
- Create an account on GitHub and login (if you don't already have one).
- Go to compeng.gg and login with your UTORid.
- On CompEng.gg, go to the Settings page (the link is on the top of the page).
- Click the "Connect with GitHub" link, and follow the directions to connect your GitHub to CompEng.gg.
You'll also need to accept the organization invite. You should have received an email directly from GitHub with a link to accept. Just in case, CompEng.gg provides the link as well, so please double-check.
That's it! If everything went okay you should have access to your very own
repository (a place where software developers store their code).
Let's try to access it now.
Note your UTORid, in my case it's eyolfso3.
The URL for your repository is
https://github.com/compeng-gg/2025-winter-aps105-<UTORID>, where you'll have
to replace <UTORID> with your UTORid.
For example, my repository is
https://github.com/compeng-gg/2025-winter-aps105-eyolfso3.
This page is where you'll be able to see your code and access your development
environment throughout the semester. A development environment is a place where you can write, run, debug and test your code. You'll be using a development environment in your browser, so you don't need to install anything on your computer, but you will need a stable internet connection. The development environment we are creating for you is called a "Codespace" and is provided by GitHub.
Setting Up Your Development Environment: A Codespace
Go to your repository page on GitHub (you should already be there from the previous steps.) Let's set up our development environment by completing the following steps:
- Click the "Code" button (it should be the only green button on your screen).
- Click the "Codespaces" tab, if it's not already selected.
- Click the "Create codespace on main" button as shown below.
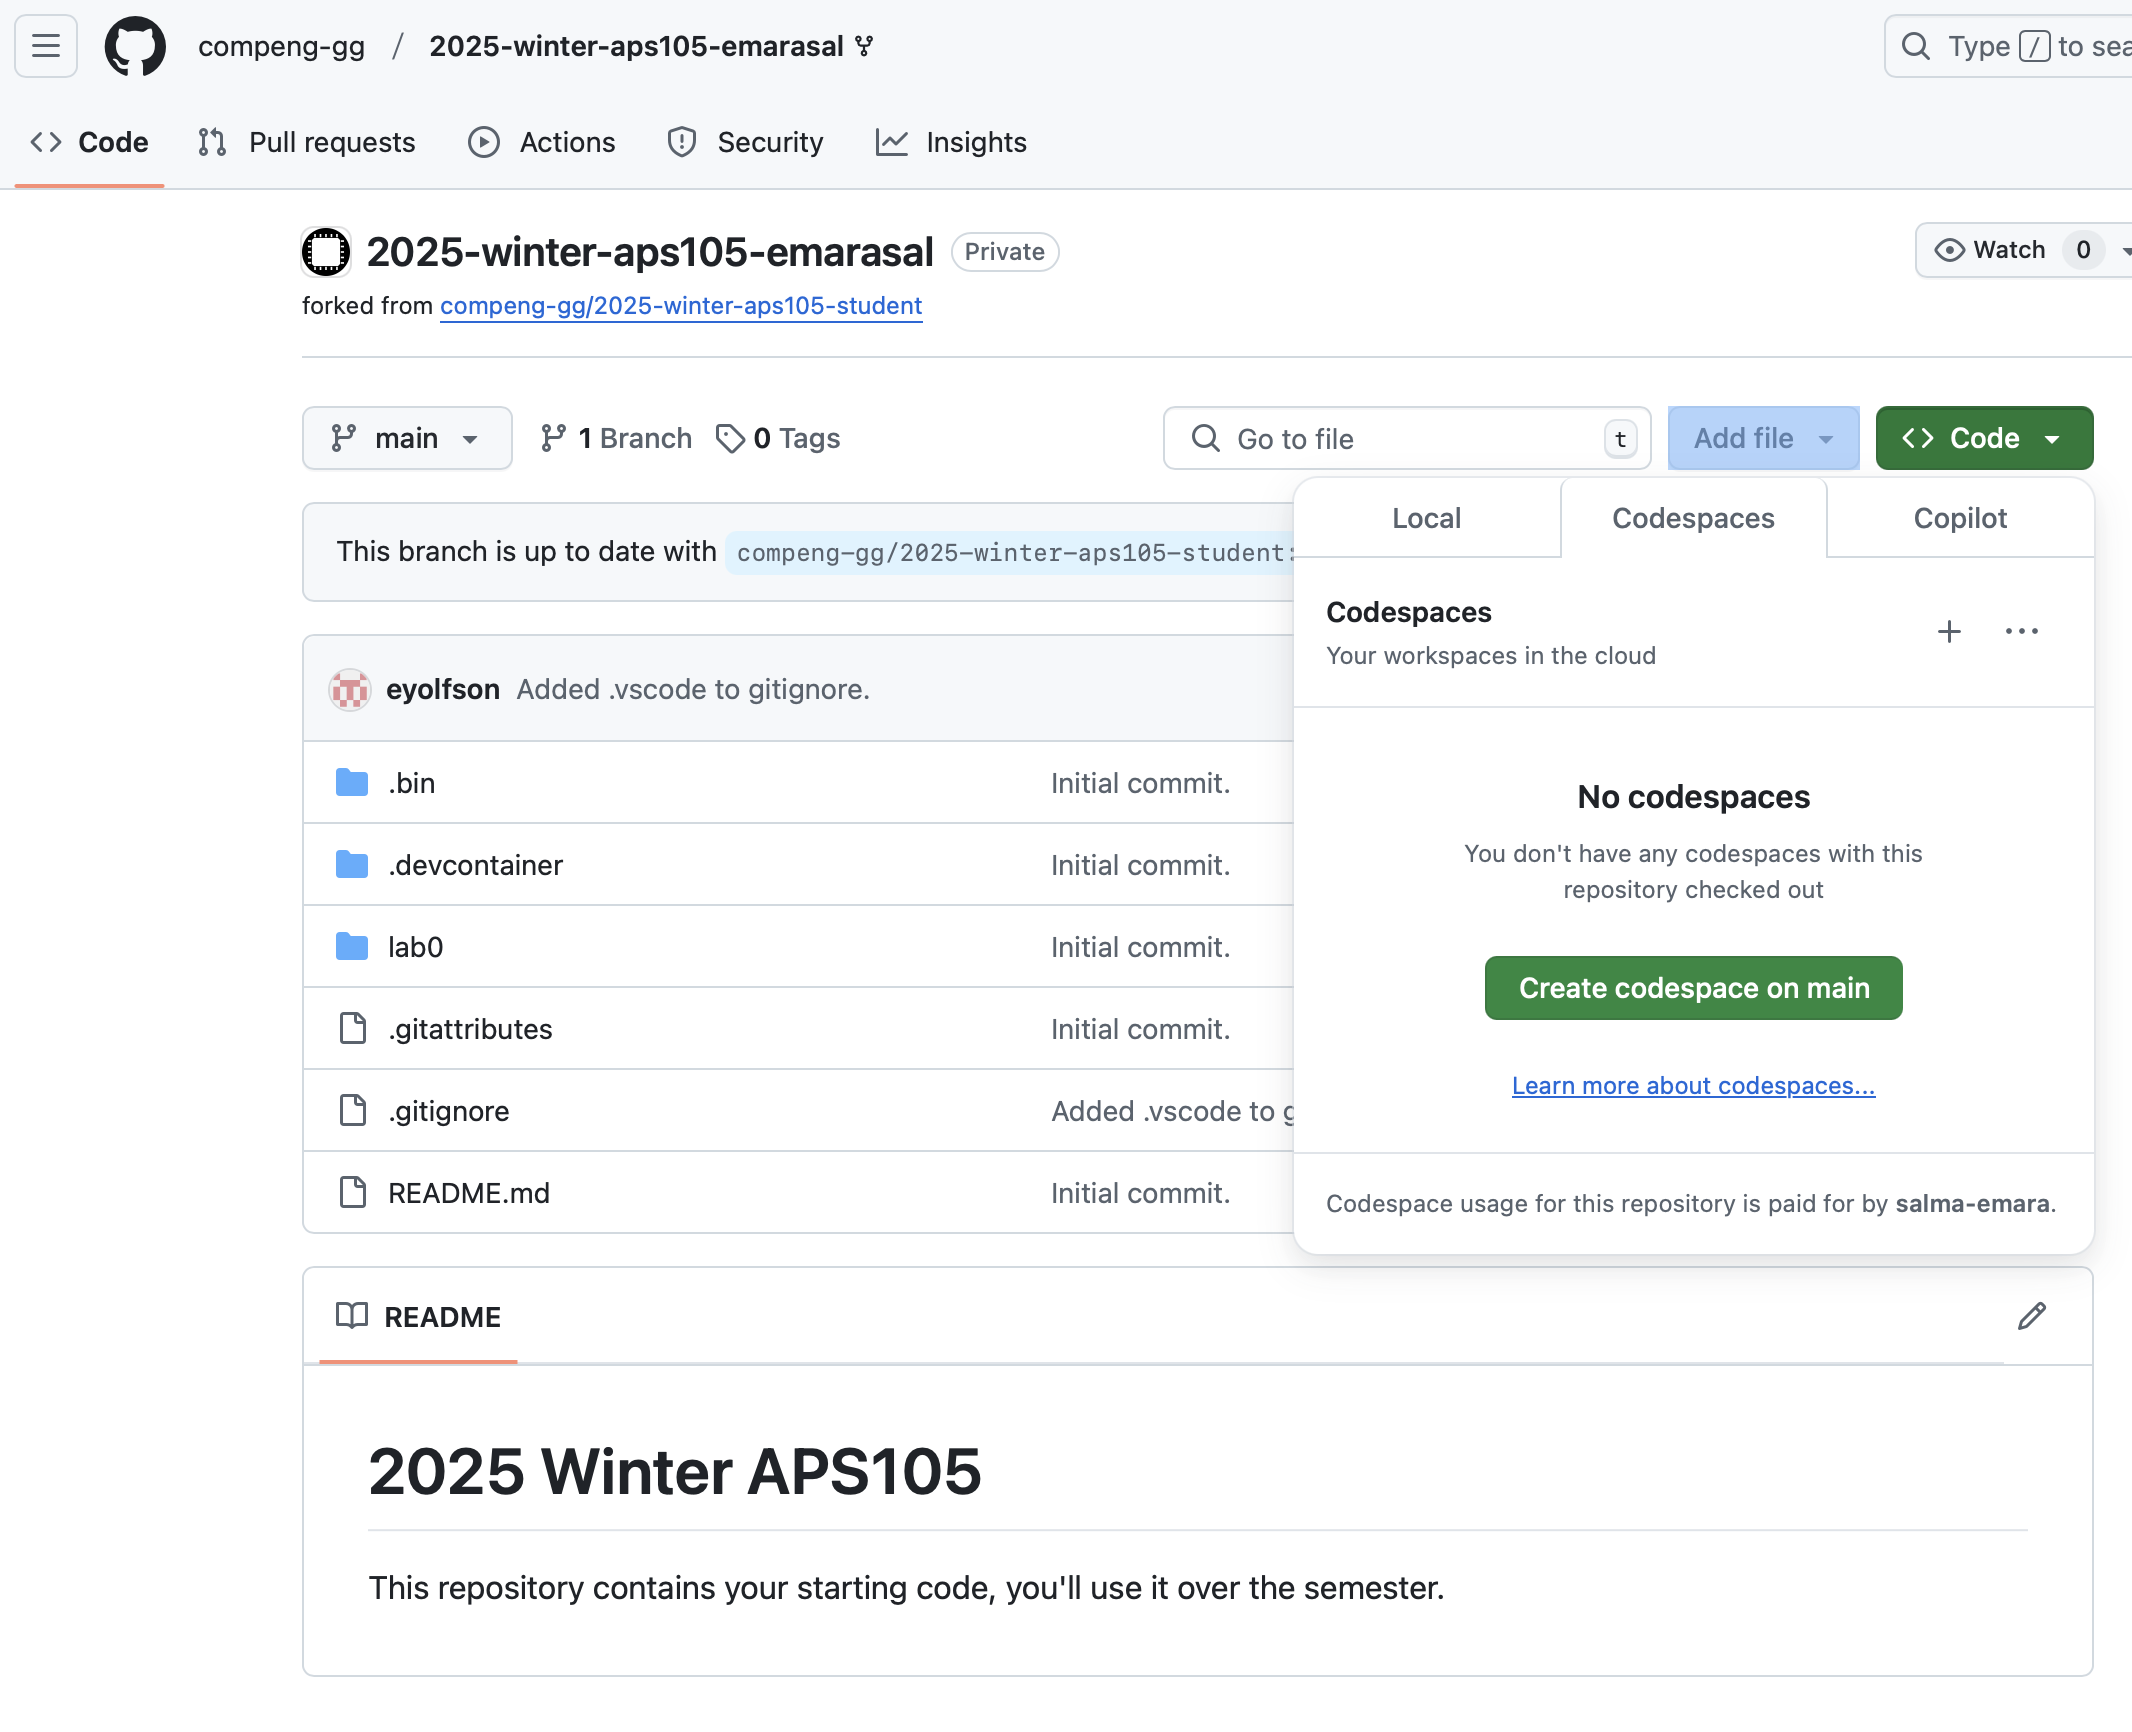 Fig.1 Creating codespace in your GitHub repository
 - This should open a new tab and start setting on your codespace (your
development environment), you'll need to wait a few minutes for it to be as shown in the figure below.
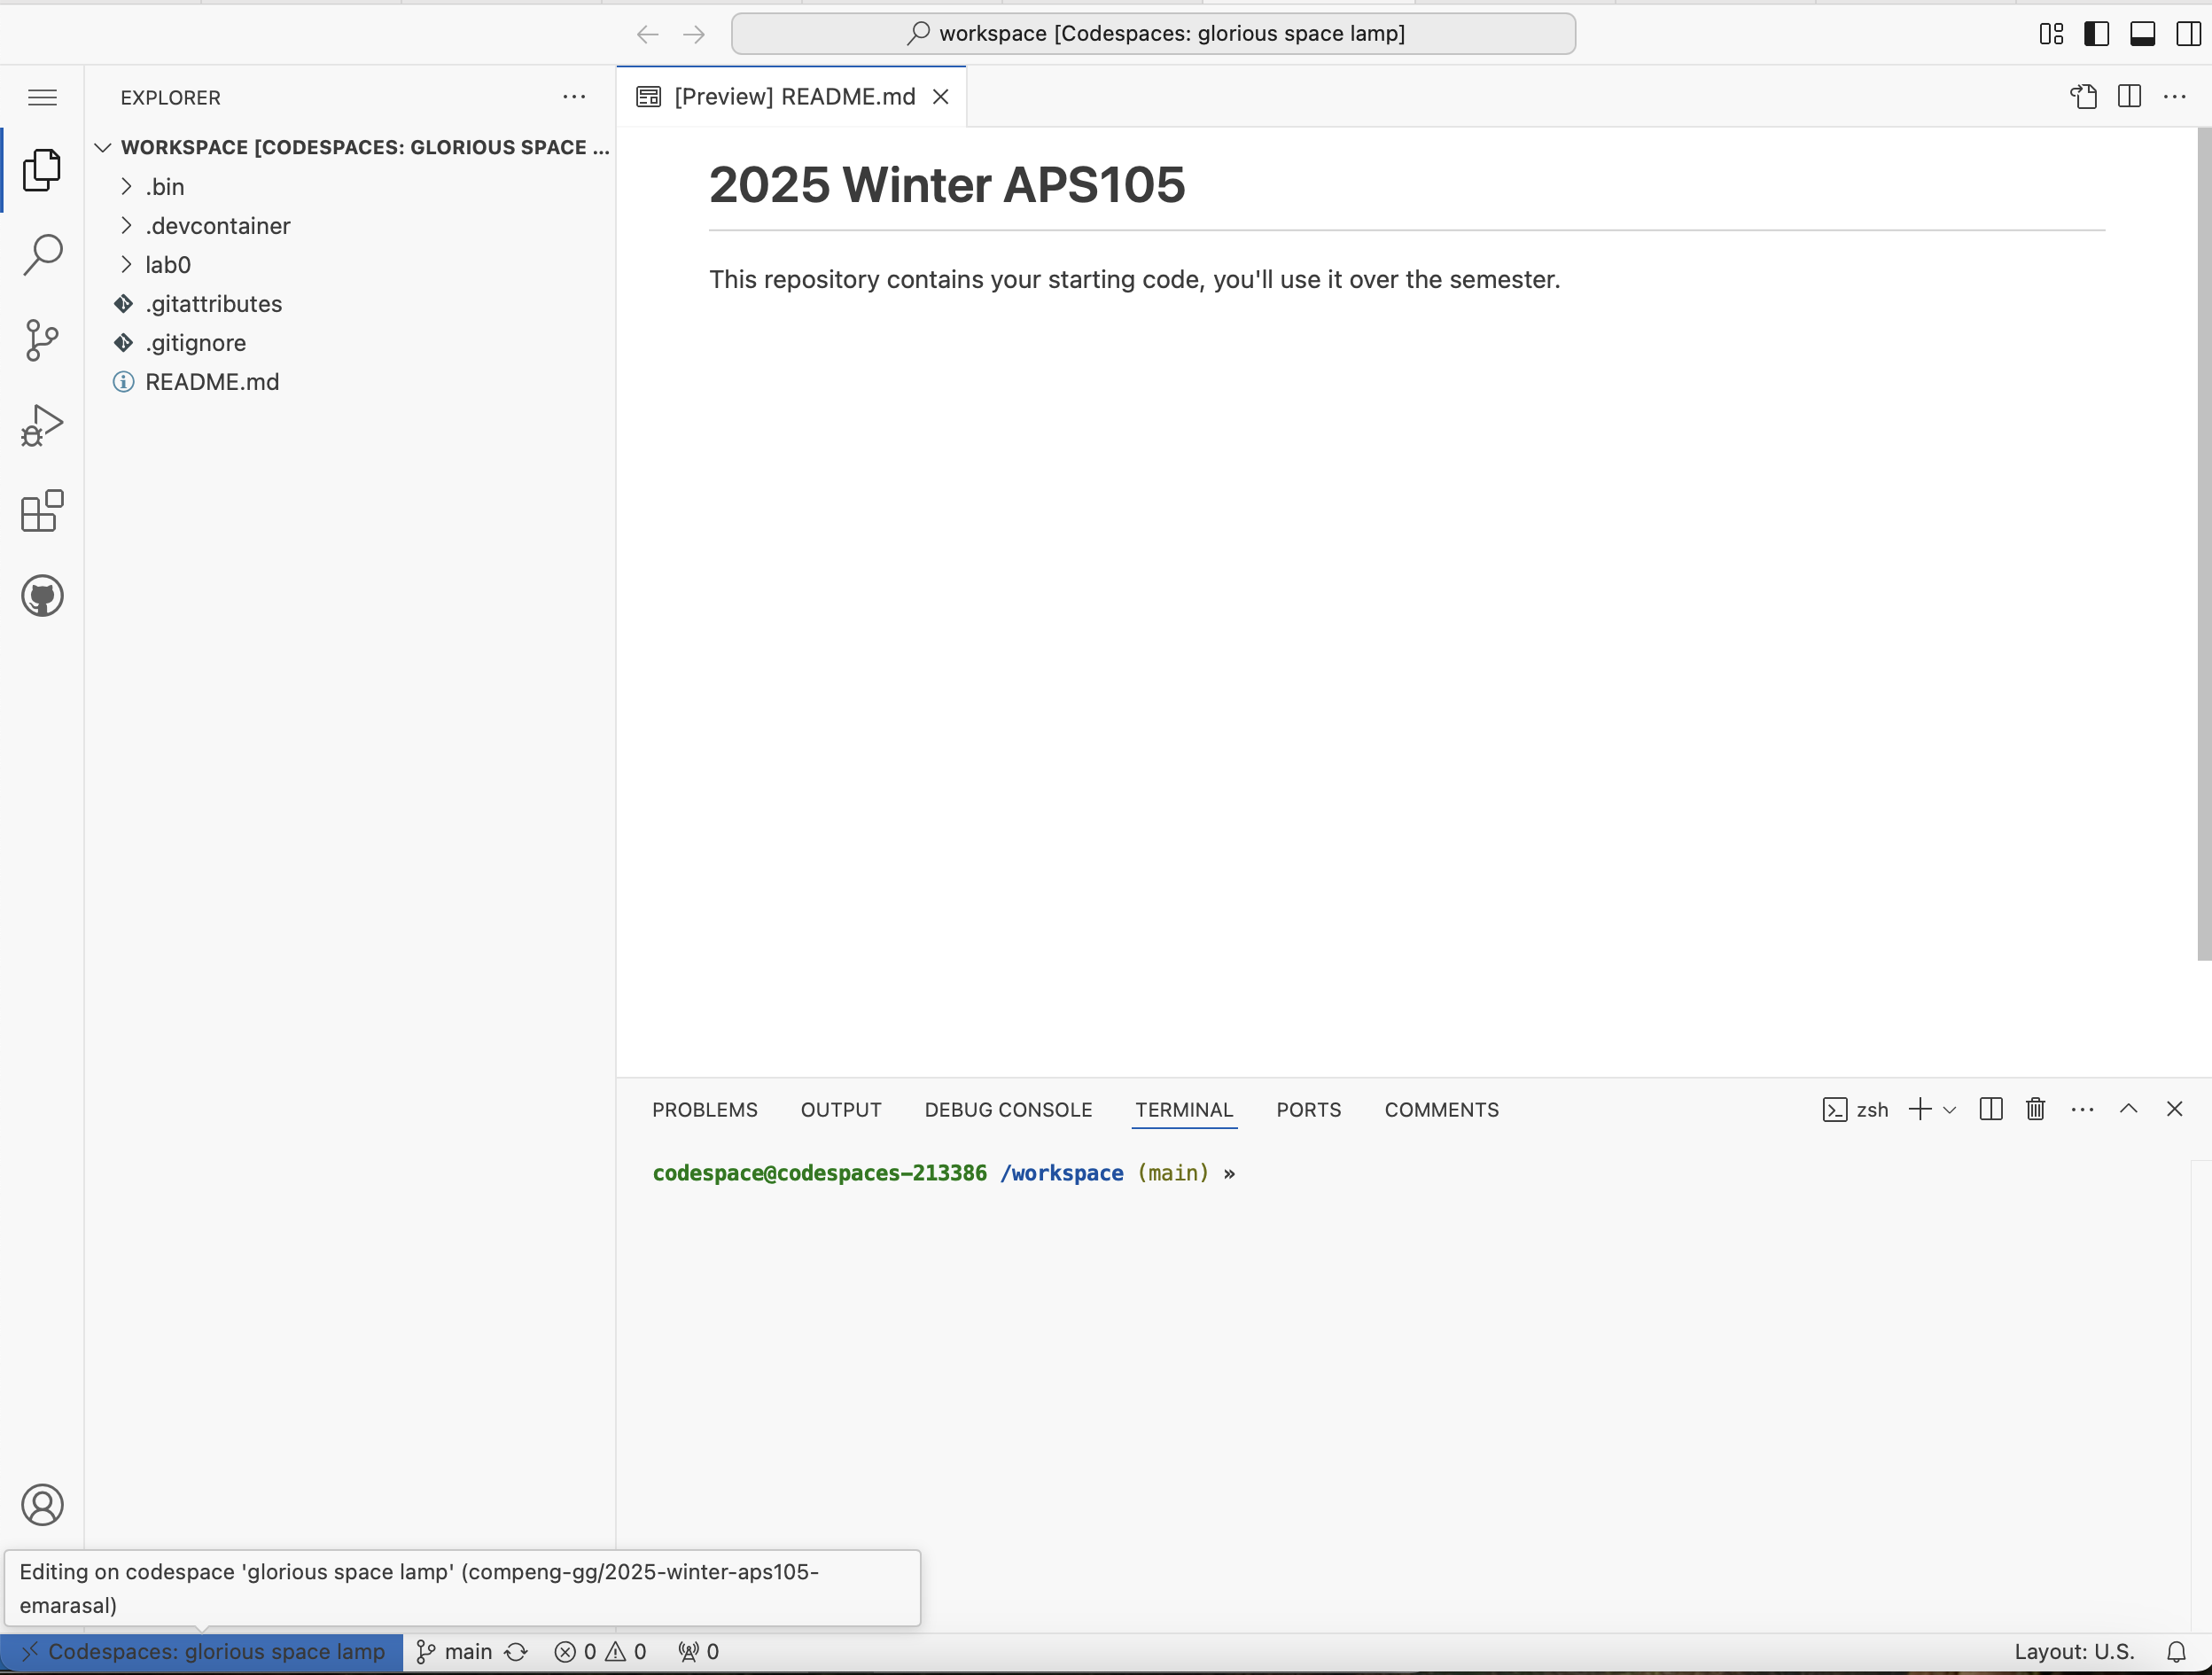 Fig.2 Codespace created in your GitHub repository
This is where you'll develop your code. If you ever need to get back to it:
go to your repository page, go to the codespaces tab (as above), and click
on the randomly assigned name under "On current branch" as shown in the figure below. My codespace is named glorious space lamp as shown in the image below.
You should not create any other codespaces.
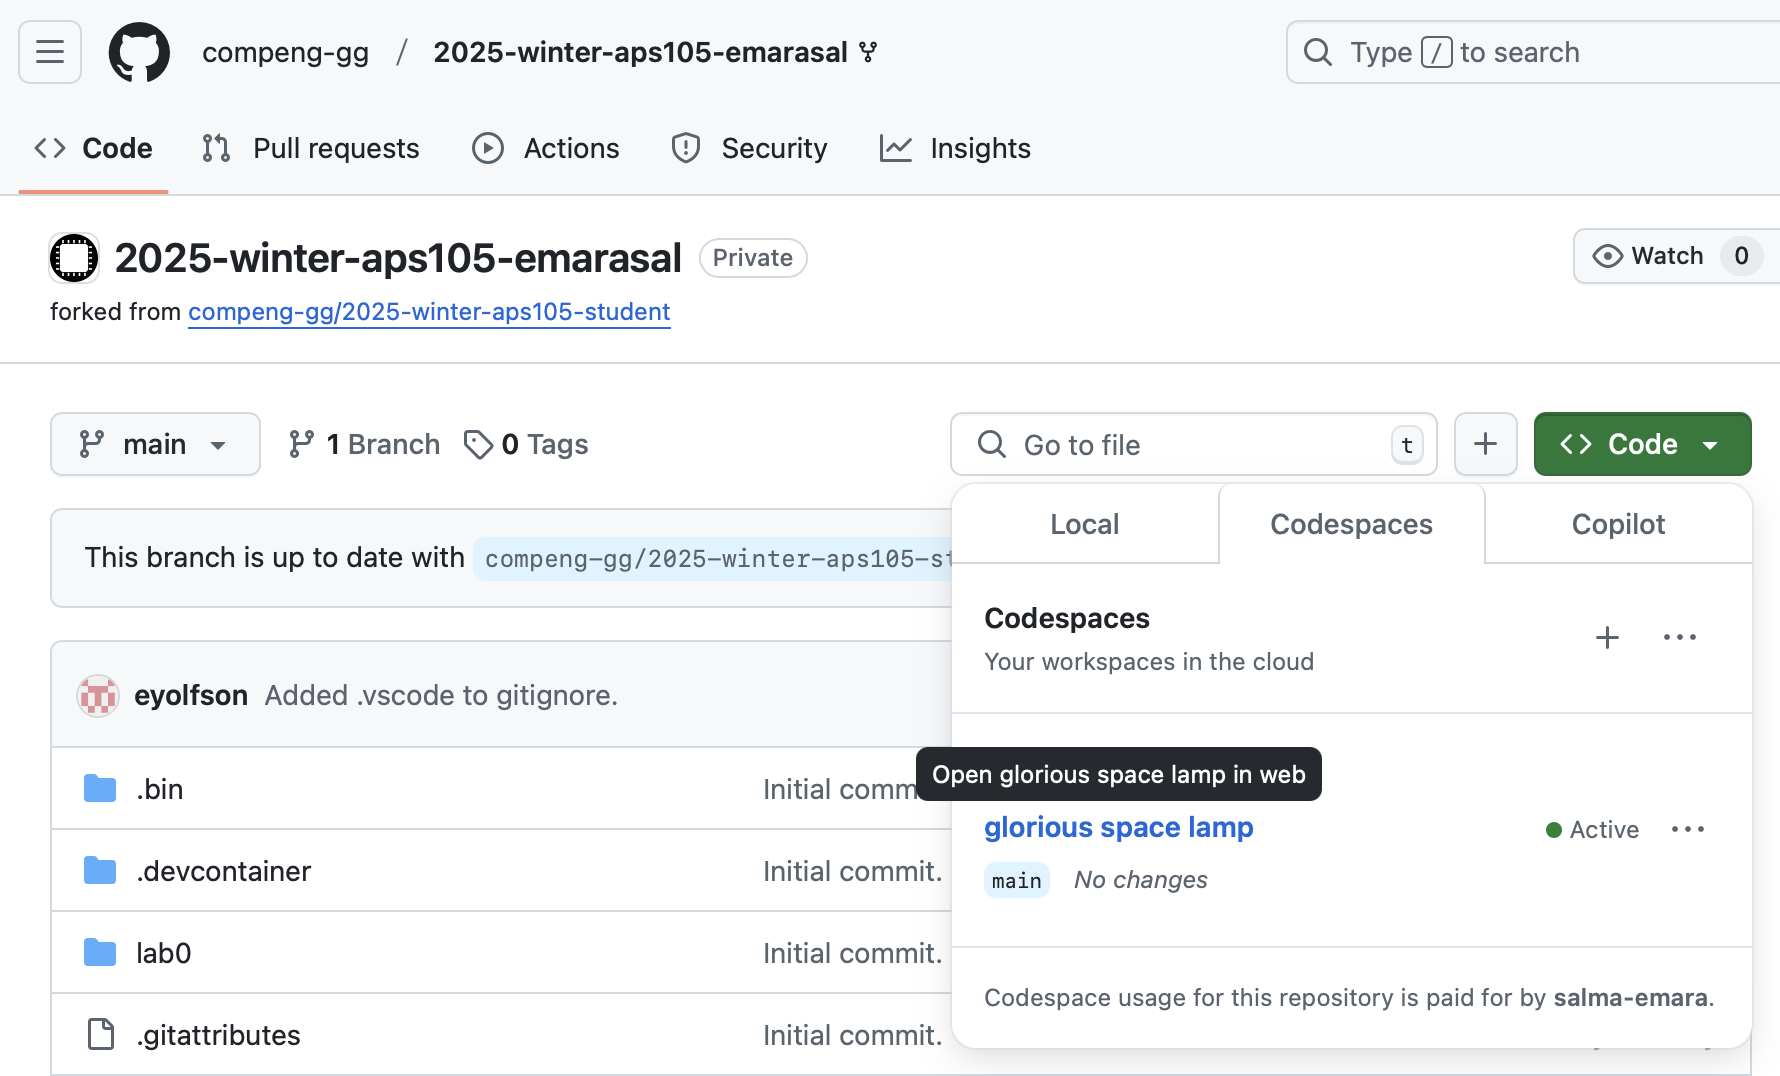 Fig.3 Existing codespace created in your GitHub repository
There are two approaches to creating, compiling and running C programs. The first approach is to use a separate tool to perform each of these actions --- a text editor to create the program file, a compile command to compile it, and another command to run it. The second approach is to use an Integrated Development Environment (IDE), which allows you to perform many tasks from a single, usually graphical, application.
In this lab, we will discuss both techniques to write, compile, run and debug your C programs. The official IDE for this course is Visual Studio Code (VS Code). You can use VS Code to write, compile, run and debug your C programs. You can also use the terminal (located at the bottom) to compile and run your programs.
Your development environment is running on Linux, a popular operating system among developers. This development environment has VS Code installed.
Compile, Run and Debug Using Visual Studio Code
Go to your codespace that you created in the previous step. You should see a screen similar to the one shown in Fig.3. The codespace had VS code installed and open by default.
-
To compile using VS Code, we need to install two necessary extensions. Go to Extensions icon as shown in the figure below.
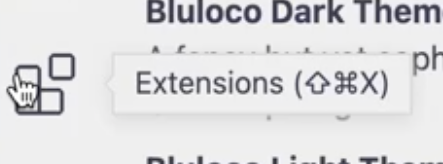
Fig.4 Extensions icon
-
Install C/C++ and C/C++ Runner extensions (as highlighted in the figure below) by clicking on "Install" after you click on each of them. Close the tabs when installations are complete.
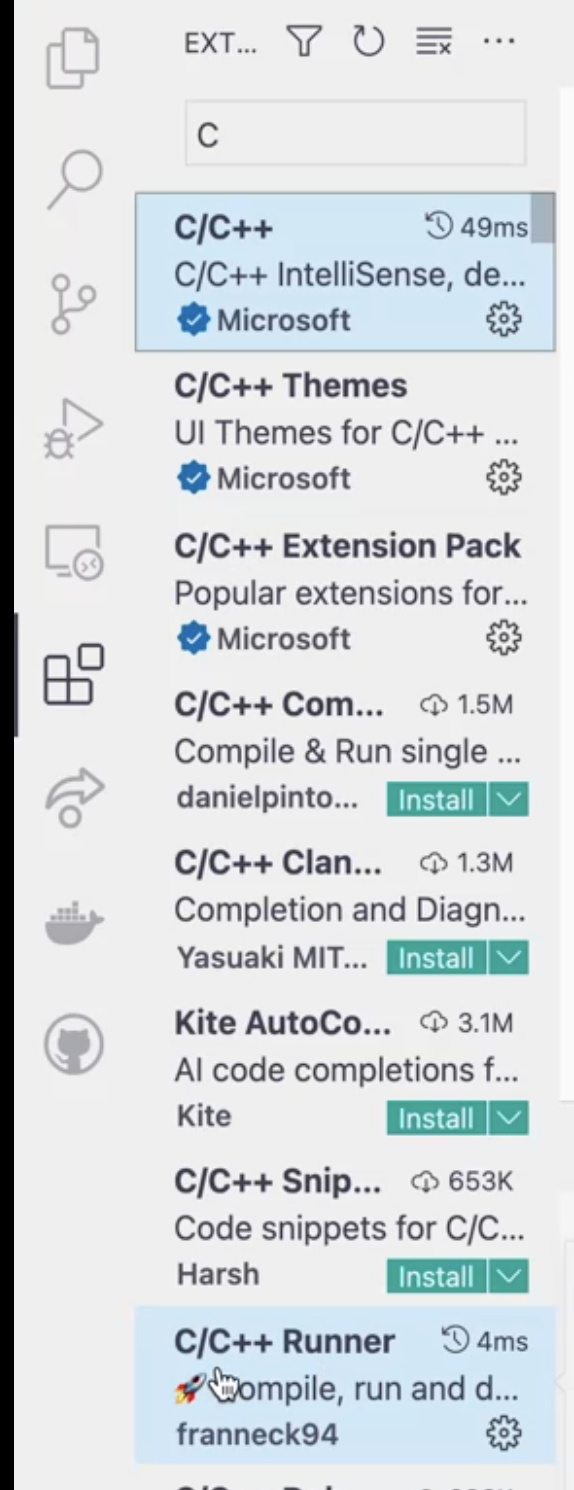
Fig.5 Install Two Extensions: C/C++ and C/C++ Runner
-
Click on the Explorer button on the top left as shown in the figure below to see the directories/folders and files you have.
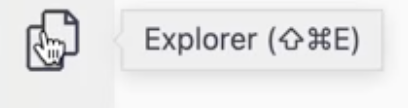
Fig.6 Explorer Icon
-
A folder named lab0 is already created for you. Click on lab0, and press the New File icon next to "Workspace" title to create a new file named
hello.cas shown in the figure below.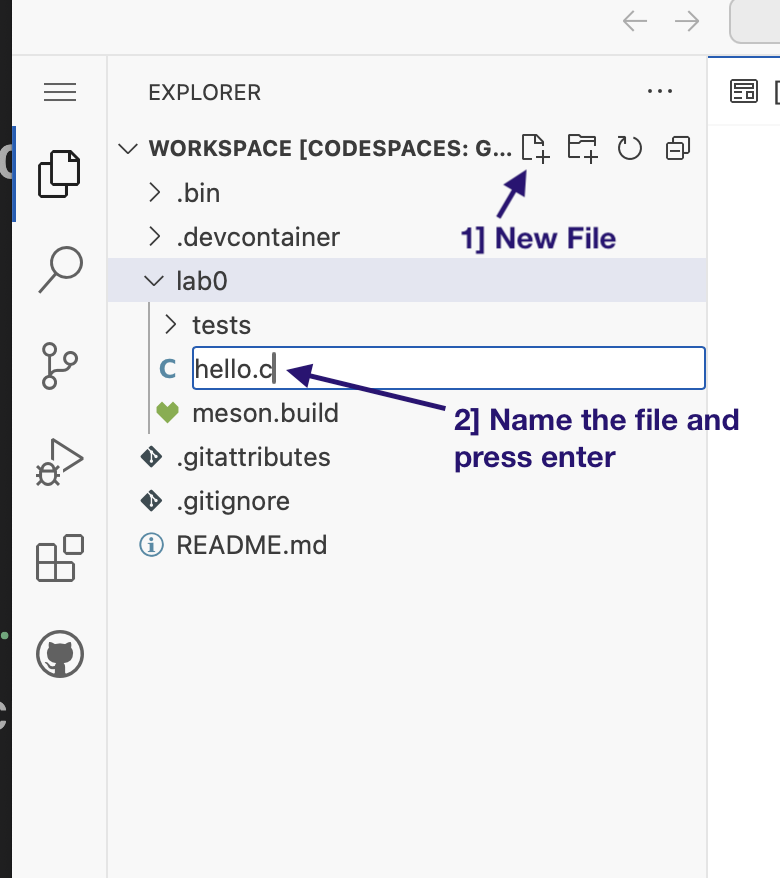
Fig.7 Directories in your repository
-
If you got the following warning, click "Disable IntelliSense" as shown in the figure below. If prompted again, click on "Reload."
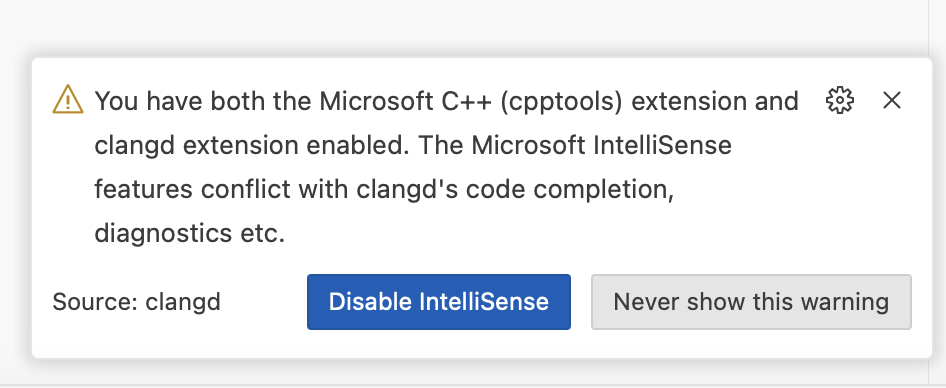 Fig.8 Disable IntelliSense
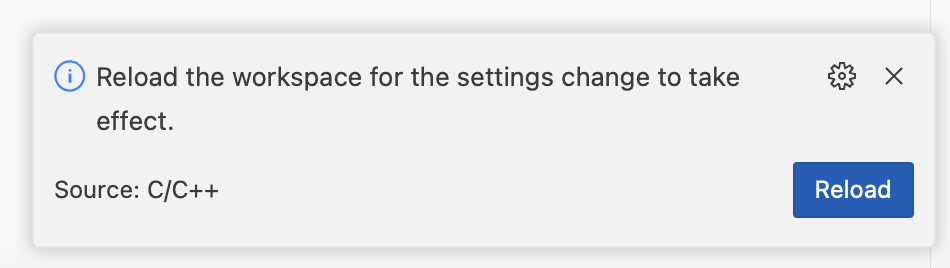 Fig.9 Reload
 -
On the bottom left of your window, you should see
Select Folderorworkspace/lab0. This helps you select a particular working folder that has a program in C that we want to compile. In our case, we want to select workspace/lab0.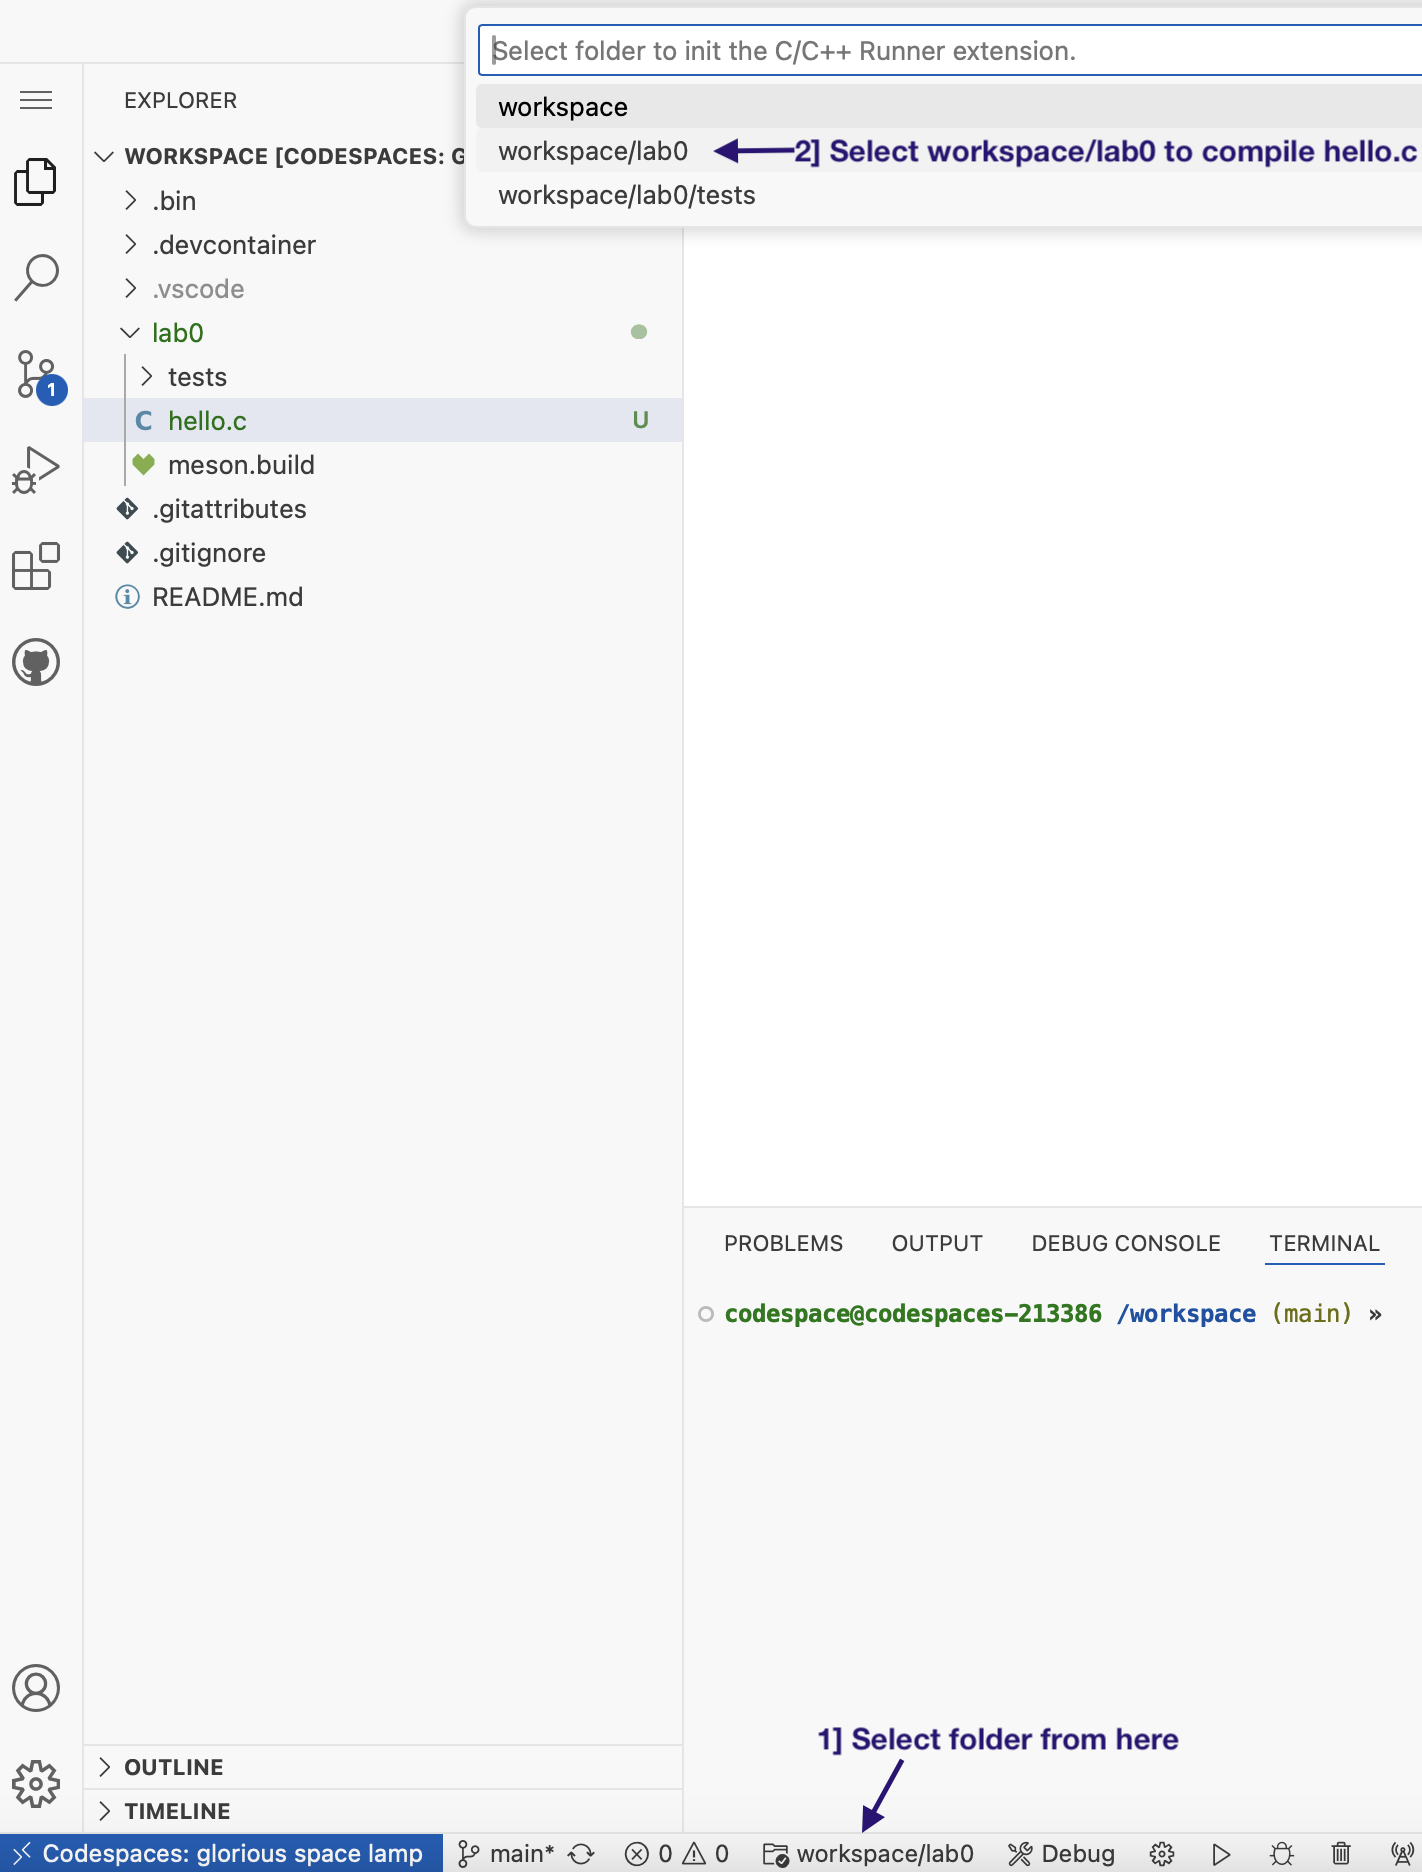 Fig.10 Select Folder
 -
Write the following test code in
hello.cfile. Your code is automatically saved in the codespace, so that you do not need to worry about saving your C program every time you make a change.#include <stdio.h>
int main() {
printf("Test!\n");
return 0;
} -
To compile your program, press the Compile button towards the bottom left of the screen as shown in the figure below. To run your program, press the Run button.
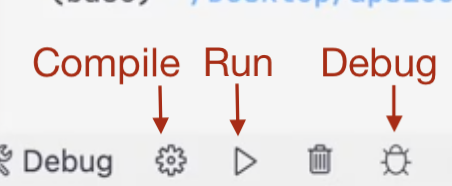
Fig.11 Handy buttons to compile, run, and debug your C program.
-
Any output will be observed in the terminal to the lower half of your VS Code window as shown in the figure below.

Fig.12 Output of the hello.c program
- Consistent code is easy to read. Consistency appears in the proper indentation, spacing and appropriate line length. To automatically ensure your code is consistent, you can use the default formatter in VS Code. To do so, go to Settings by clicking on the gear at the bottom left of VS Code window
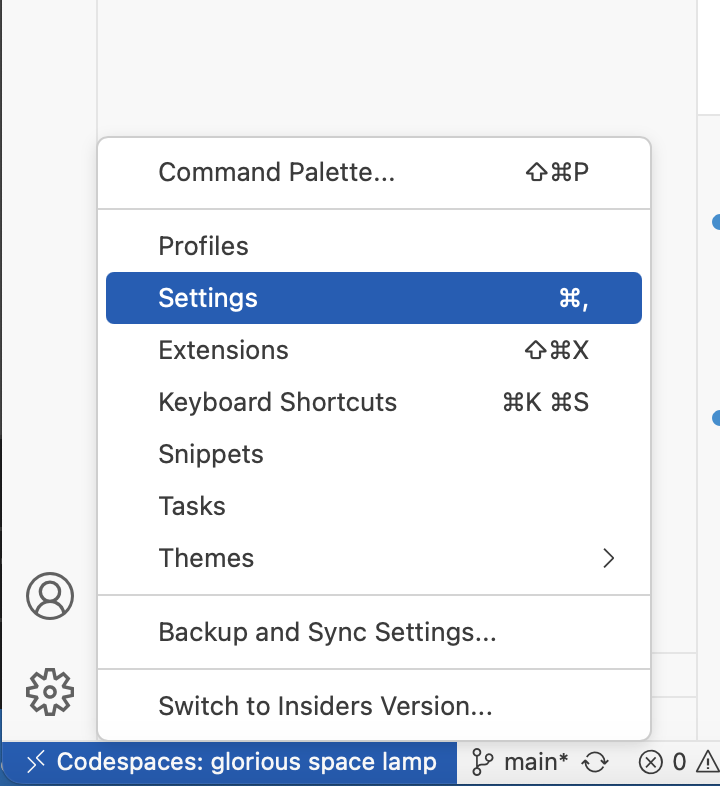
Fig.13 Settings icon
- In the search bar, type "formatter". Check the Editor: Format on Save is ticked. This will automatically format your code every time you save by pressing on Crtl+S on Windows or Cmd+S on Mac.
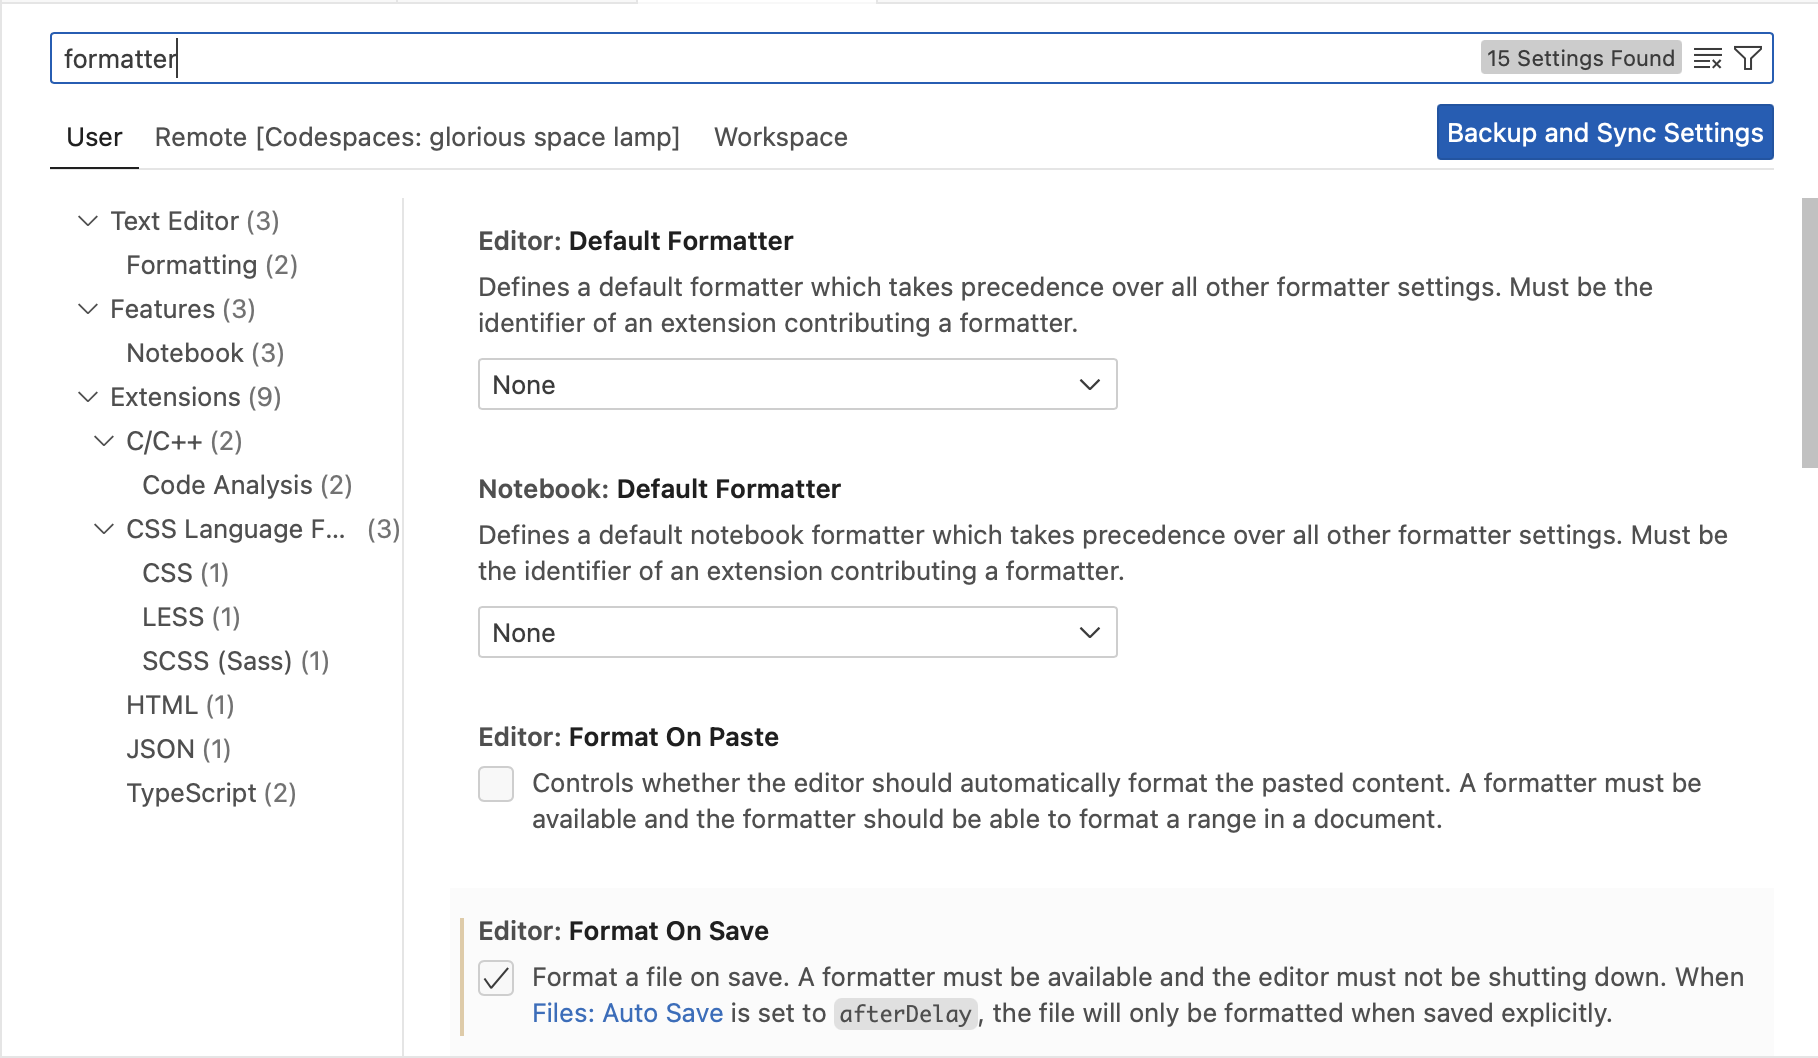
Fig.14 Format on save turned on
Debugging in VS Code
Walking through individual lines of your code step by step to inspect code and identify and fix bugs in software and hardware is called debugging.
-
To debug your code, you need to add a breakpoint. A breakpoint is a line of code where your program will pause at when you click the Debug button. To create a breakpoint, you need to hover over the line you want your code to pause at and click there as shown in the figure below.
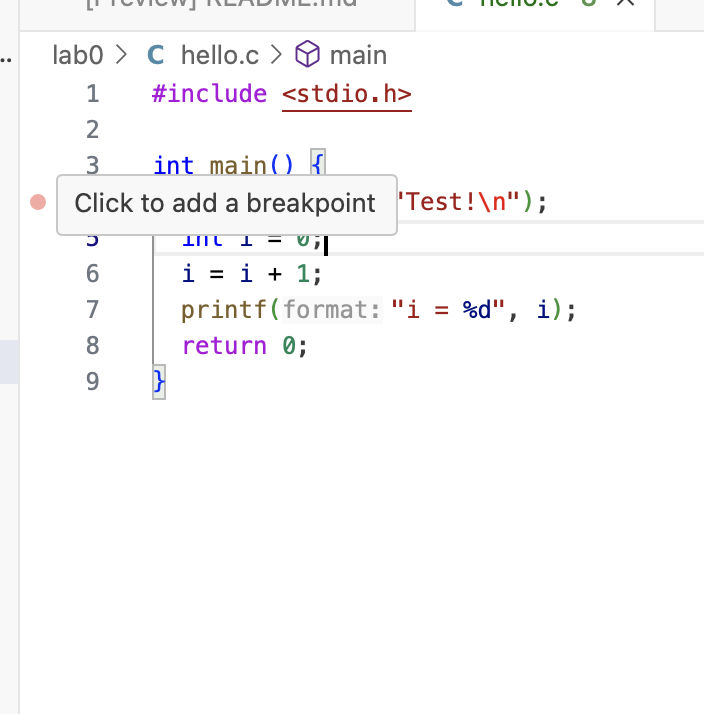
Fig.15 Hover over the rightmost of a line to add a breakpoint
-
Let's add a few lines to help us observe the debugging process. Add the following code to your
hello.cfile.#include <stdio.h>
int main() {
printf("Test!\n");
int i = 0;
i = i + 1;
printf("i = %d\n", i);
return 0;
} -
Click on the Compile button to compile, then Start Debugging button. Your code will stop at your breakpoint without executing it, unless you press Step over button as shown in the figure below. As you step over, you will see the value of
ichanging from 0 to 1. If you want to continue running the program, without debugging further, you can press the Continue button. If you want to stop debugging, you can press the Stop button.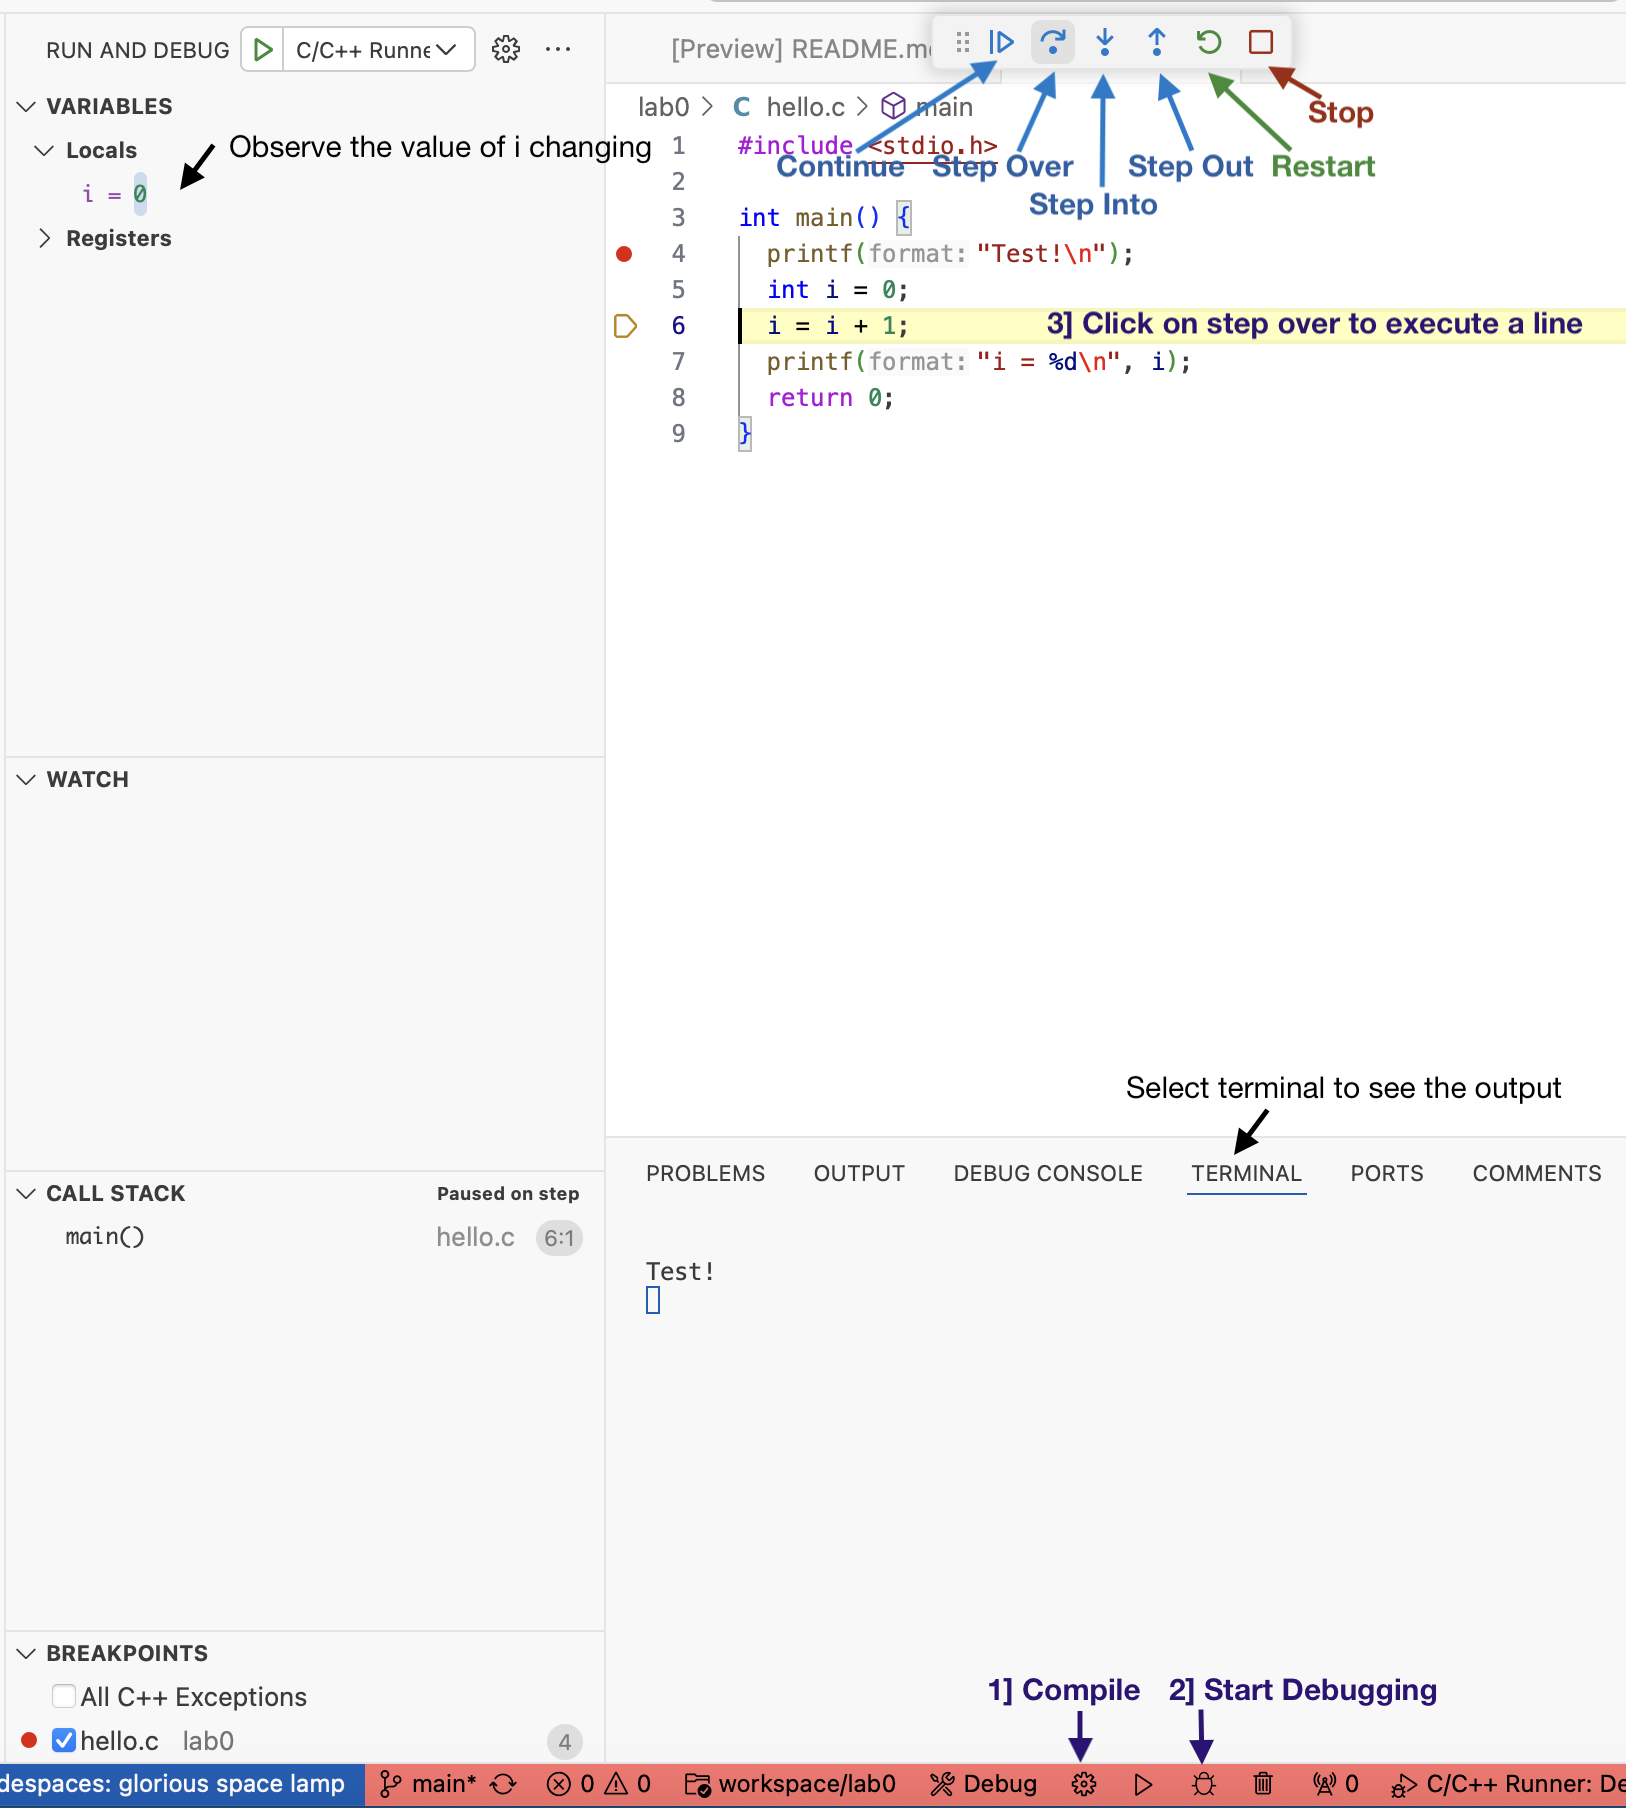
Fig.15 Hover over the rightmost of a line to add a breakpoint
A Brief Introduction to Linux
The terminal lets you use the command line. The command line lets you type instructions to the computer directly, which is powerful for software development. Let's start by understanding files and directories and the commands you'll use to navigate them.
To use the terminal, click on terminal tab on the bottom of your screen. It should look as follows.
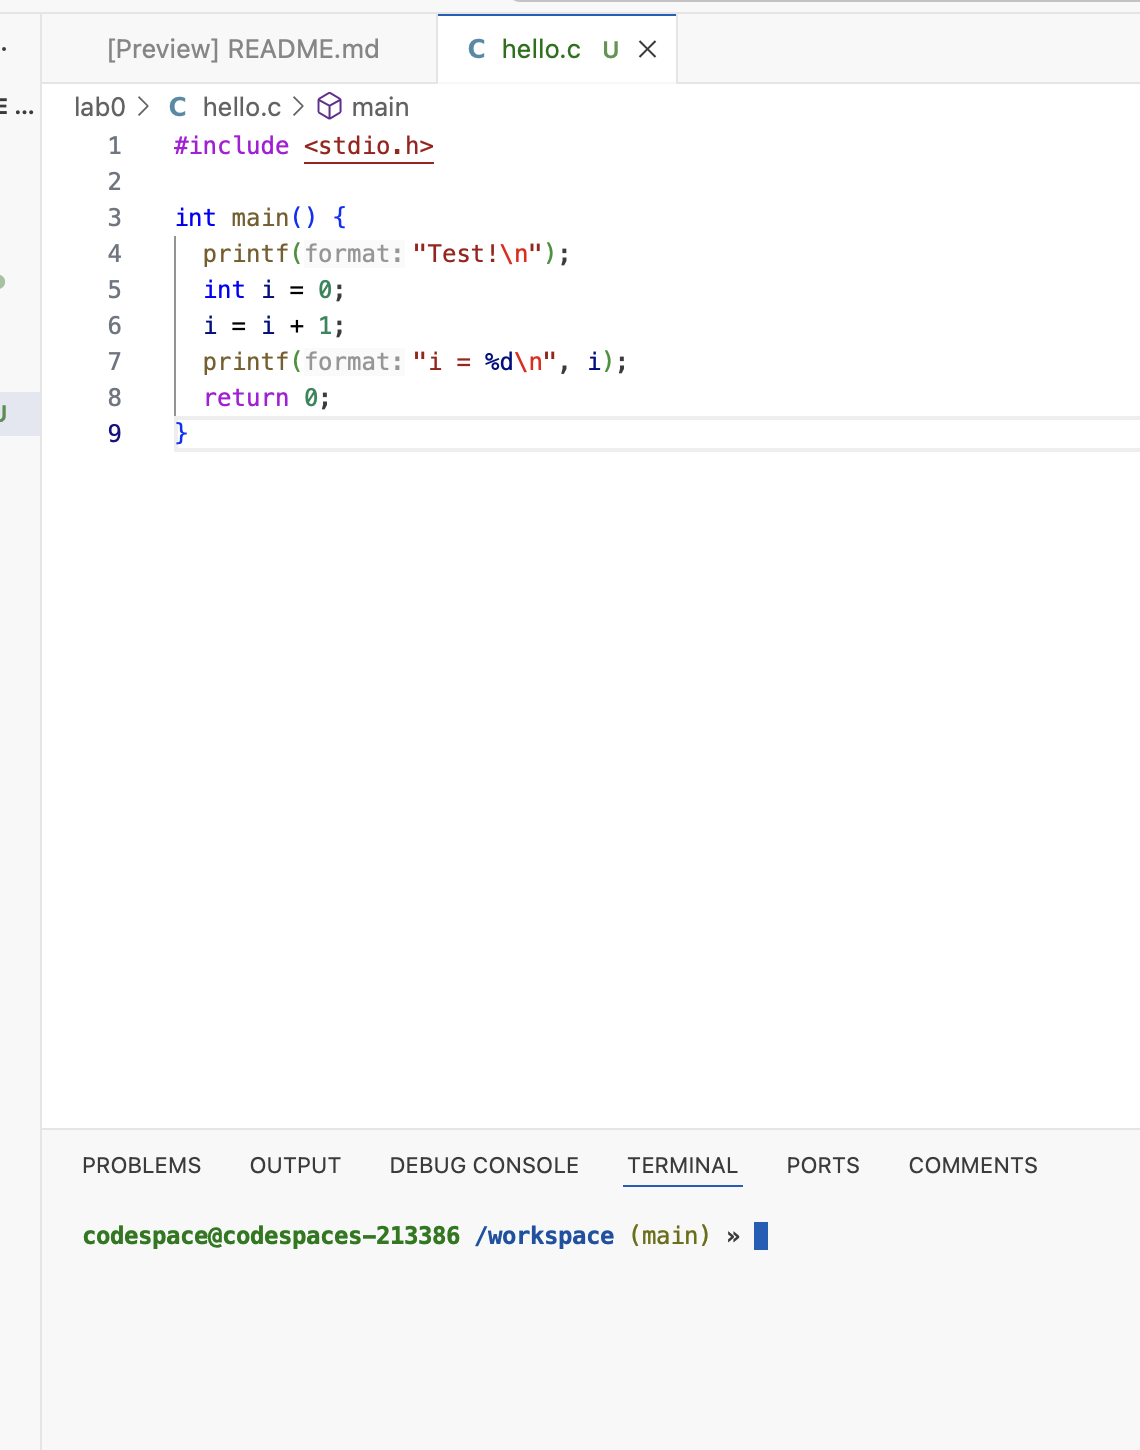
Fig.16 Terminal Window in VS Code
Files and Directories: Why They Matter
Files store data—like code, images, or text—while directories (folders) help organize those files into meaningful groups. Without this structure, finding specific data or managing projects would become very messy. Think of directories as labeled boxes and files as the items inside.
Basic Commands
Here are three key commands to help you navigate the command line:
-
pwd(Print Working Directory)This command shows your current location in the file system. Try typing this in the terminal and then press enter/return:
pwdThe output should look like
/workspace. This is the directory you're currently in, this directory will contain more directories (one for every lab). -
ls(List)Use this command to see the contents of the current directory:
lsThe output should look like:
lab0 README.mdThis shows the names of files and directories contained in the current working directory. Each file has a black background, and each directory has a green background (by default in your development environment, others may display them differently). In this case,
README.mdis a file containing text that should describe your repository, andlab0is a directory containing the content for this lab. -
cd(Change Directory)Use
cdto move between directories. For example:cd lab0This changes your current directory to
lab0within/workspace. Try runningpwdagain, it should output/workspace/lab0. If you want to go back one directory (back to/workspace), use:cd ..Confirm you're back in
/workspaceby runningpwdyet again.
Understanding these basics will help you navigate your project and use Linux effectively.
Compile and Run Using the Terminal
You'll create a simple C program that prints (outputs) "Hello world!" to the
terminal.
This will help you practice navigating the Linux file system and using basic
commands.
You'll also learn to compile, test, and run your program.
Complete the following steps:
-
Navigate to the Lab Directory
From practicing the basic commands, you should be familiar with this, use:
cd lab0 -
Open the
hello.cFileIn the Explorer panel (usually on the left), click on the
lab0directory to expand it (showing its contents), and double clickhello.c. This is the contents of yourhello.cthat you'll fill in. -
Write Your Program
Add the following code to
hello.c:#include <stdio.h>
int main() {
printf("Test!\n");
return 0;
} -
Manually Compile Your Program
You can manually compile your code by using a compiler, popular options are
clangandgcc(both are programs you can use). Compile your program using the following command:clang hello.c -o helloThis program expects a C file to compile (the first name,
hello.c), then typing-osignifies the next name is what to use for the name of the output executable file (your program) that the computer will run/execute. In this case we're calling ithello. -
Manually Running Your Program
You can run your program by simply typing
./hello. The.is a special character that means the current directory (the result ofpwd), then/is a directory separator, andhellois the name of the program you want to run. We have to run our program like this instead of simply typinghellobecause our program isn't in the directory this operating system searches for programs../helloYou should see the following output:
Test!We're going to use some nicer commands. We'll first delete our
helloprogram by using a new command:rm. This command deletes a file, so use it wisely. Let's delete our program we created manually:rm hello -
Delete the
builddirectoryTo help you compile automatically, we'll be using a custom
compilecommand to compile our code. This command creates abuilddirectory that contains our executable. To avoid conflicts with the existingbuilddirectory created by VS Code, we will delete this existingbuilddirectory. Use the following command to delete thebuilddirectory:rm -rf build -
Compile Your Program
We've created a custom
compilecommand for you to simplify compiling code (it uses more advanced compiler options). Type the following command:compile -
Run Your Program
The compile command creates a
builddirectory, this directory contains your executable along with additional files required to create your executable. Run your executable with the following command (it's located in thebuilddirectory):build/hellonoteIf you have a newer version of the code this command doesn't work, use the following command instead:
meson-build/helloYou should see the following output:
Test! -
Testing Your Program
For labs, we'll provide you with basic test cases that'll automatically check if your code is correct. To run these tests we created a custom
testcommand for you. Try running the tests with the following command:testWe expect a different output, so you should be able to scroll up (if needed) and see some errors as in the following image. The negative sign
-in front ofTest!indicates that the expected output does not haveTest!, and+in front ofHello world!means that the expected output hasHello world!.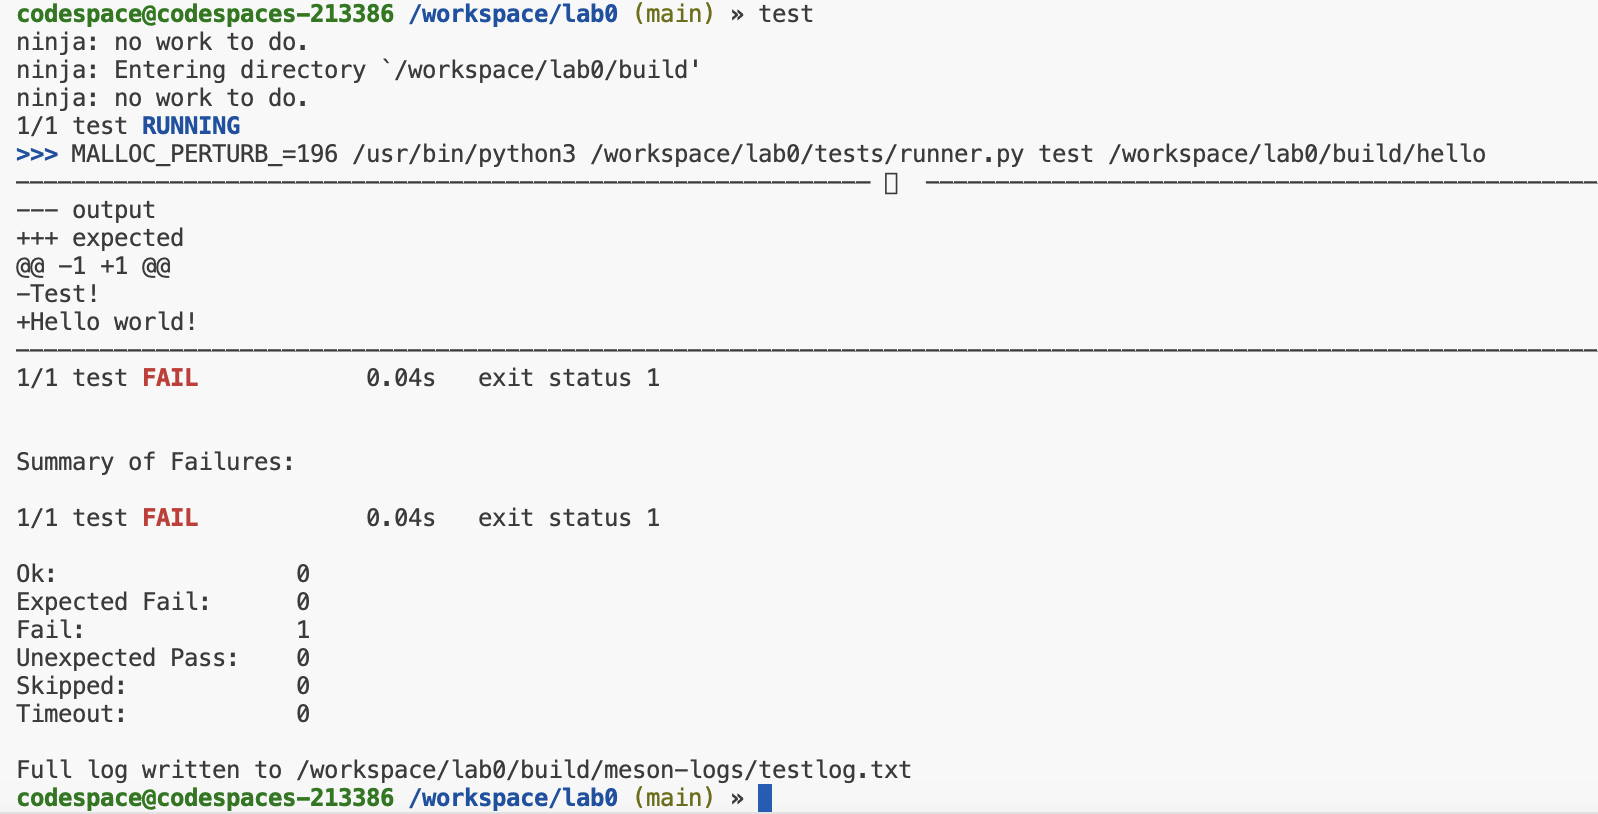
Let's try to submit our code with errors and try the automated system.
Note: If you want to compile, run and debug your code using the handy buttons in VS Code at the bottom, you can do so as well. However, if you change hello.c, you need to always re-compile. For example, you should always compile using the handy button before using the run button. Similarly, before using the test or build/hello command, you should be using compile.
Submitting Your Lab
Your code is stored using Git. Git is a version control system that tracks changes to your code and lets developers easily collaborate with others (unfortunately for this course you're the only one working on your code). A great resource for learning Git is the Pro Git book which is freely available online. Follow these steps to submit your work:
Check the Status of Your Changes
Use git status to see which files have been modified or added:
git status
This helps you confirm which files need to be committed (a commit is basically a checkpoint for your code, you should create them early and often).
Stage Your Changes
Use git add to stage the files you want to include in your commit:
git add hello.c
This tells Git to include hello.c in the next commit.
Commit Your Changes
Use git commit to save your changes with a meaningful message:
git commit -m "Lab 0: Attempt #1."
The commit message should explain what changes you made and why.
Push Your Changes to the Repository
Use git push to upload your changes to the remote repository:
git push
This makes your work available on GitHub, so its saved and shared with our automated tools. Your submissions must be available on GitHub, always make sure your changes are there.
Why These Steps Matter
git status: Ensures you know what changes are being tracked.git add: Stages only the files you want to commit, avoiding accidental changes.git commit: Creates a snapshot of your work with a meaningful description.git push: Shares your work with others and backs it up remotely.
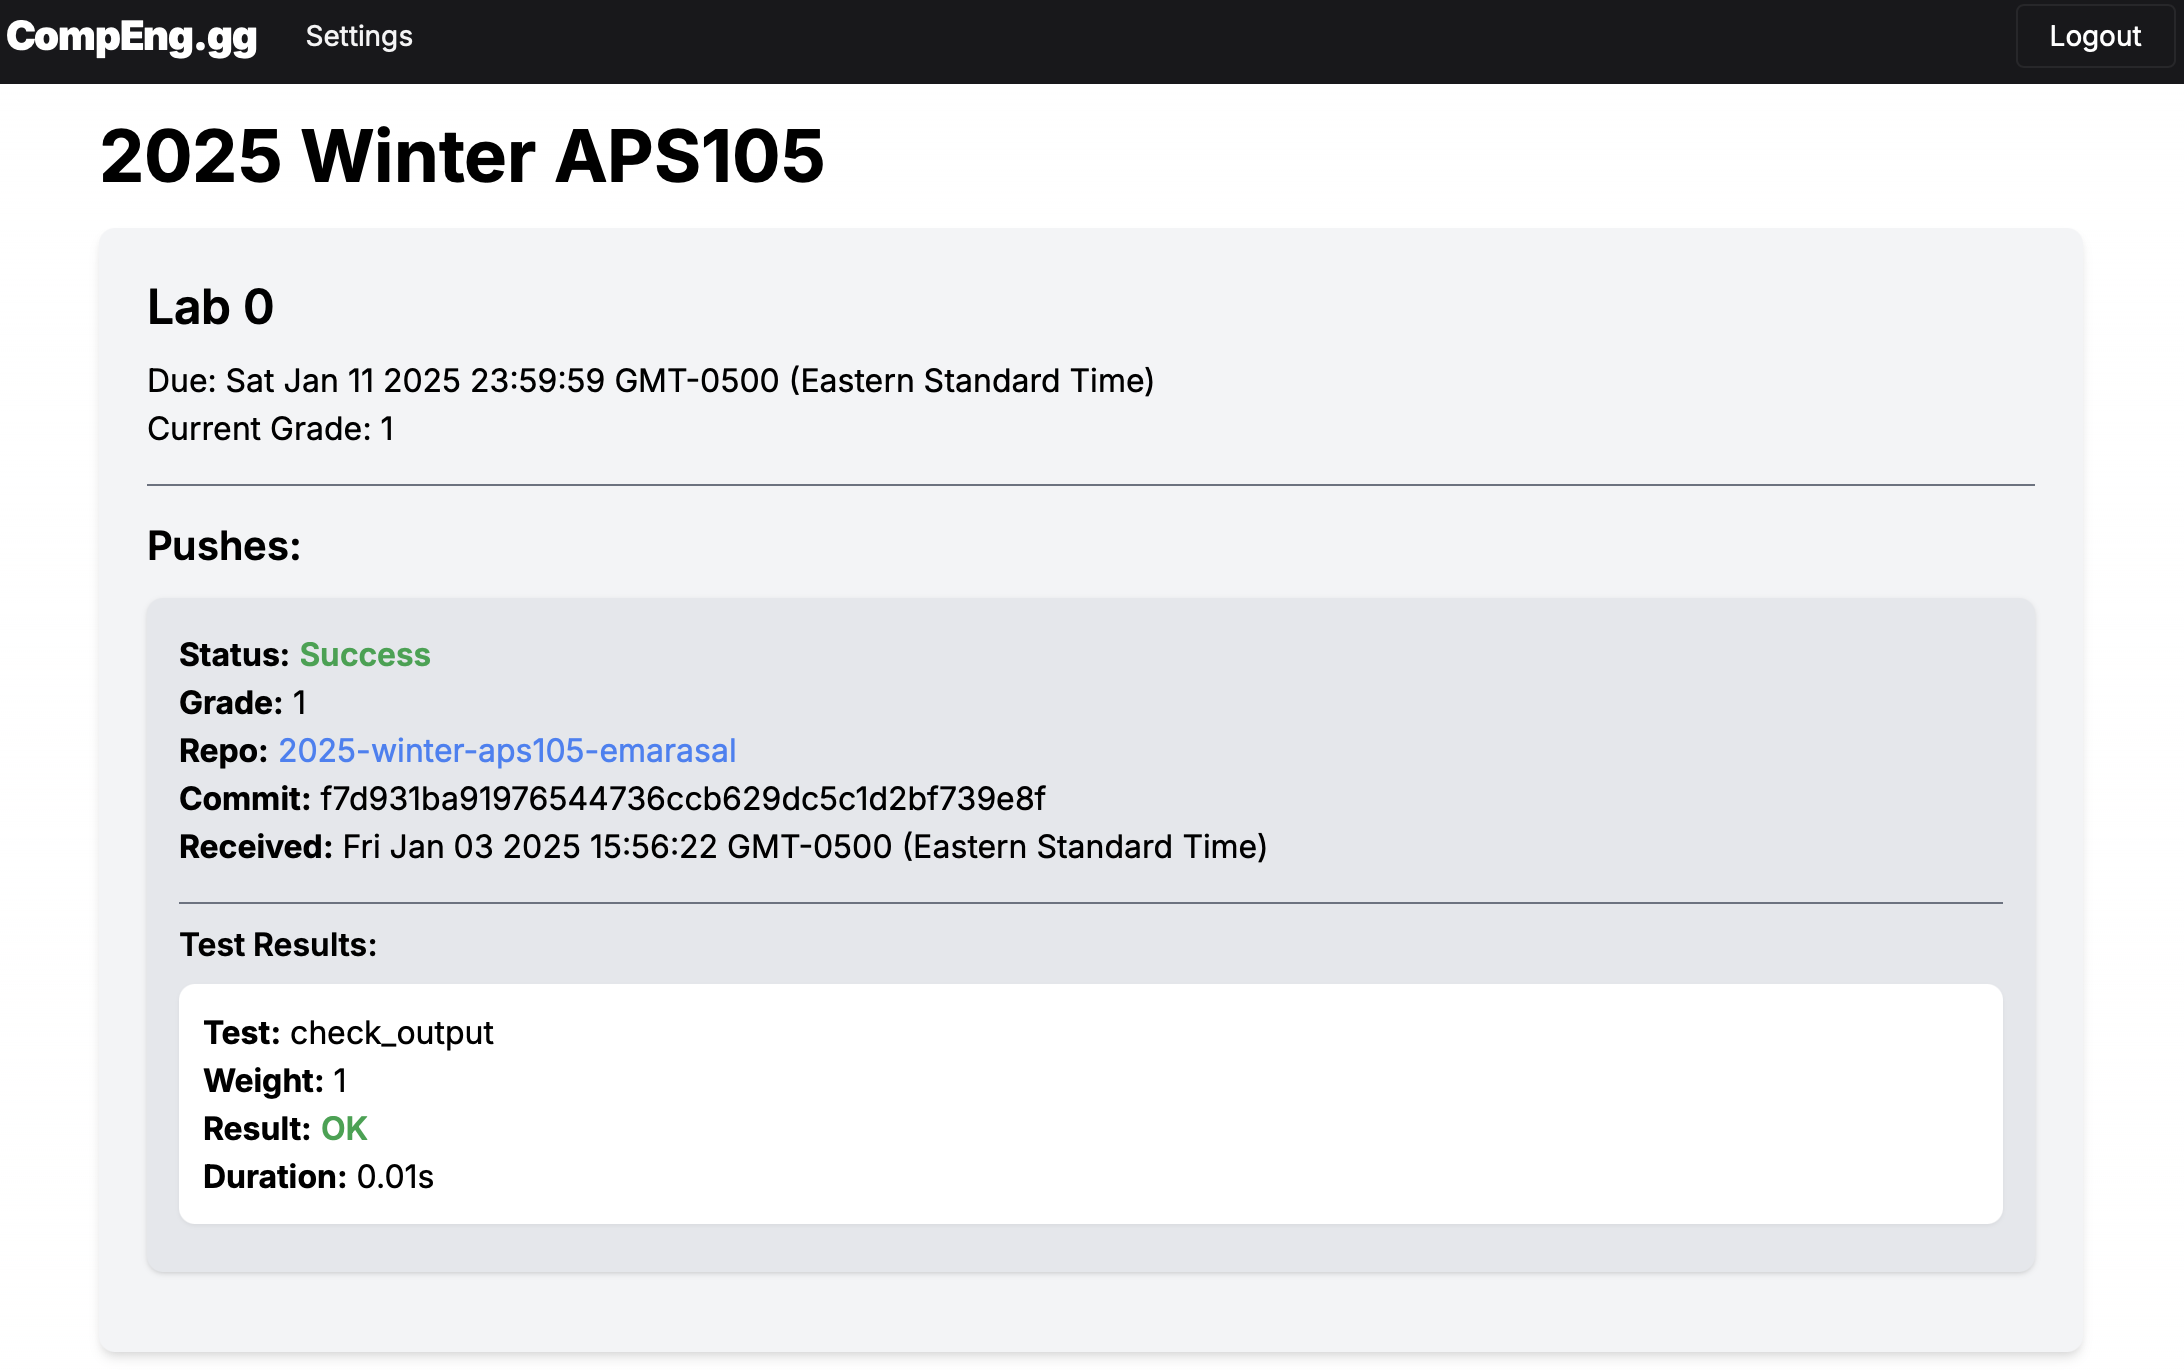
Congratulations! You've created for first submission for this lab. Let's check CompEng.gg to see if the automated process worked.
Verifying Your Submission
Go to CompEng.gg and click on the course list, or go directly to APS105. You should see a submission on the website, showing you the same issue when you tested your code yourself.
Under "Lab 0", you'll see "Pushes", we'll test your code for every push you
run.
In this case you'll see a grade of 0 for this push since it's not correct yet.
Please change the printf string to match what it's supposed to be for this
lab, then create and push a new commit.
You should see a grade of 1 for your new push, if not identify the issue
and push again.
You may push as many times as you wish before the due date, we'll always take
your highest grade.
When your submission is correct, you'll see something that looks as follows: