Lab 5: Elementary Cellular Automaton
Objective
The objective of this lab is to develop a program in C that simulates a Elementary Cellular Automaton. This assignment will help you practice:
- Working with arrays
- Working with binary representation of numbers
- Working with boundary conditions in arrays
It is due February 15, 2025 at 11:59 PM.
Grades
This lab is worth 13 marks, as follows:
- 5 marks for the public test cases.
- 5 marks for the hidden private test cases.
- 3 marks for in-person lab marking.
You can always see your public test cases automarker grades here APS105 after every submission. They are out of 5.
The in-person lab marking is worth 3 marks, and will be marked by a TA in-person. You should go to your assigned lab section, your assigned TA and sit on your assigned workstation. You will find this information on Quercus under Lab Subsection. You must sit in your assigned seat for the TA to grade you. Otherwise, they will mistakenly think you are absent and give you a 0. The in-lab grading is due March 8, 2025 in your practical session (the following week after the midterm week). There are no labs or tutorials during the midterm week. Your assigned TA will ask you to demonstrate your understanding of using the debugger on VS Code: step over, step into, continue and break points. If you have any questions about this, please refer to plenary lecture 3 recording on Quercus. Coding style will not be assessed in this lab.
Instructions
-
Go to your GitHub repo from lab 0 by following this link:
https://github.com/compeng-gg/2025-winter-aps105-<UTORID>, where you'll have to replace<UTORID>with your UTORid. -
Open the same codespace you created for lab0. You should not create any other codespaces.
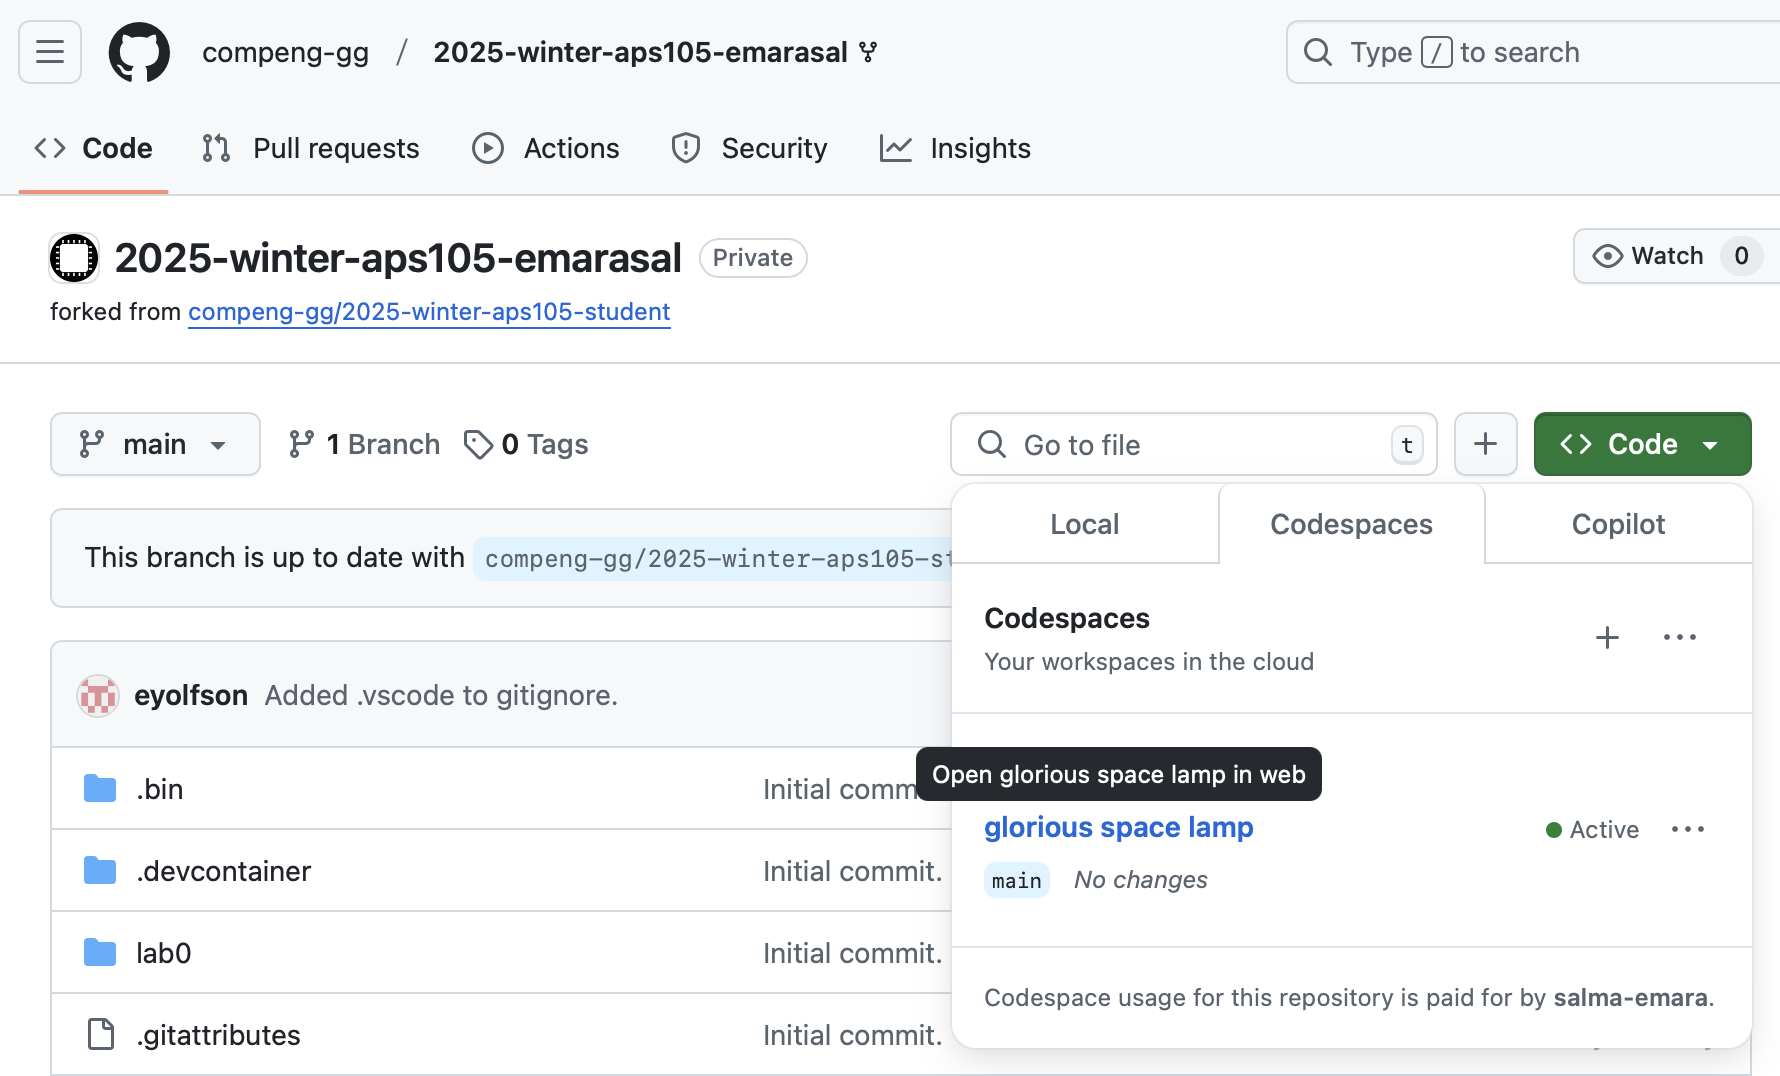 Fig.1 Existing codespace created in your GitHub repository
 -
In the terminal, type in the following command to transfer (pull) lab 5 material into your codespace:
pullThis will do a "pull" (which gets files from the "student" repository, containing starter code). This helper command will make sure you commit all your changes before you can start Lab 3. You should always commit (and push) your changes!
-
You should see a folder called lab5 in your repository.
Important! If you're using the Codespace to save the lecture notes, you'll get "You must commit all your changes (check
git status)". To resolve this, you may use the following command instead:git pull upstream mainIf you get the following error, please press on
Ctrl+Xfor Mac and Windows.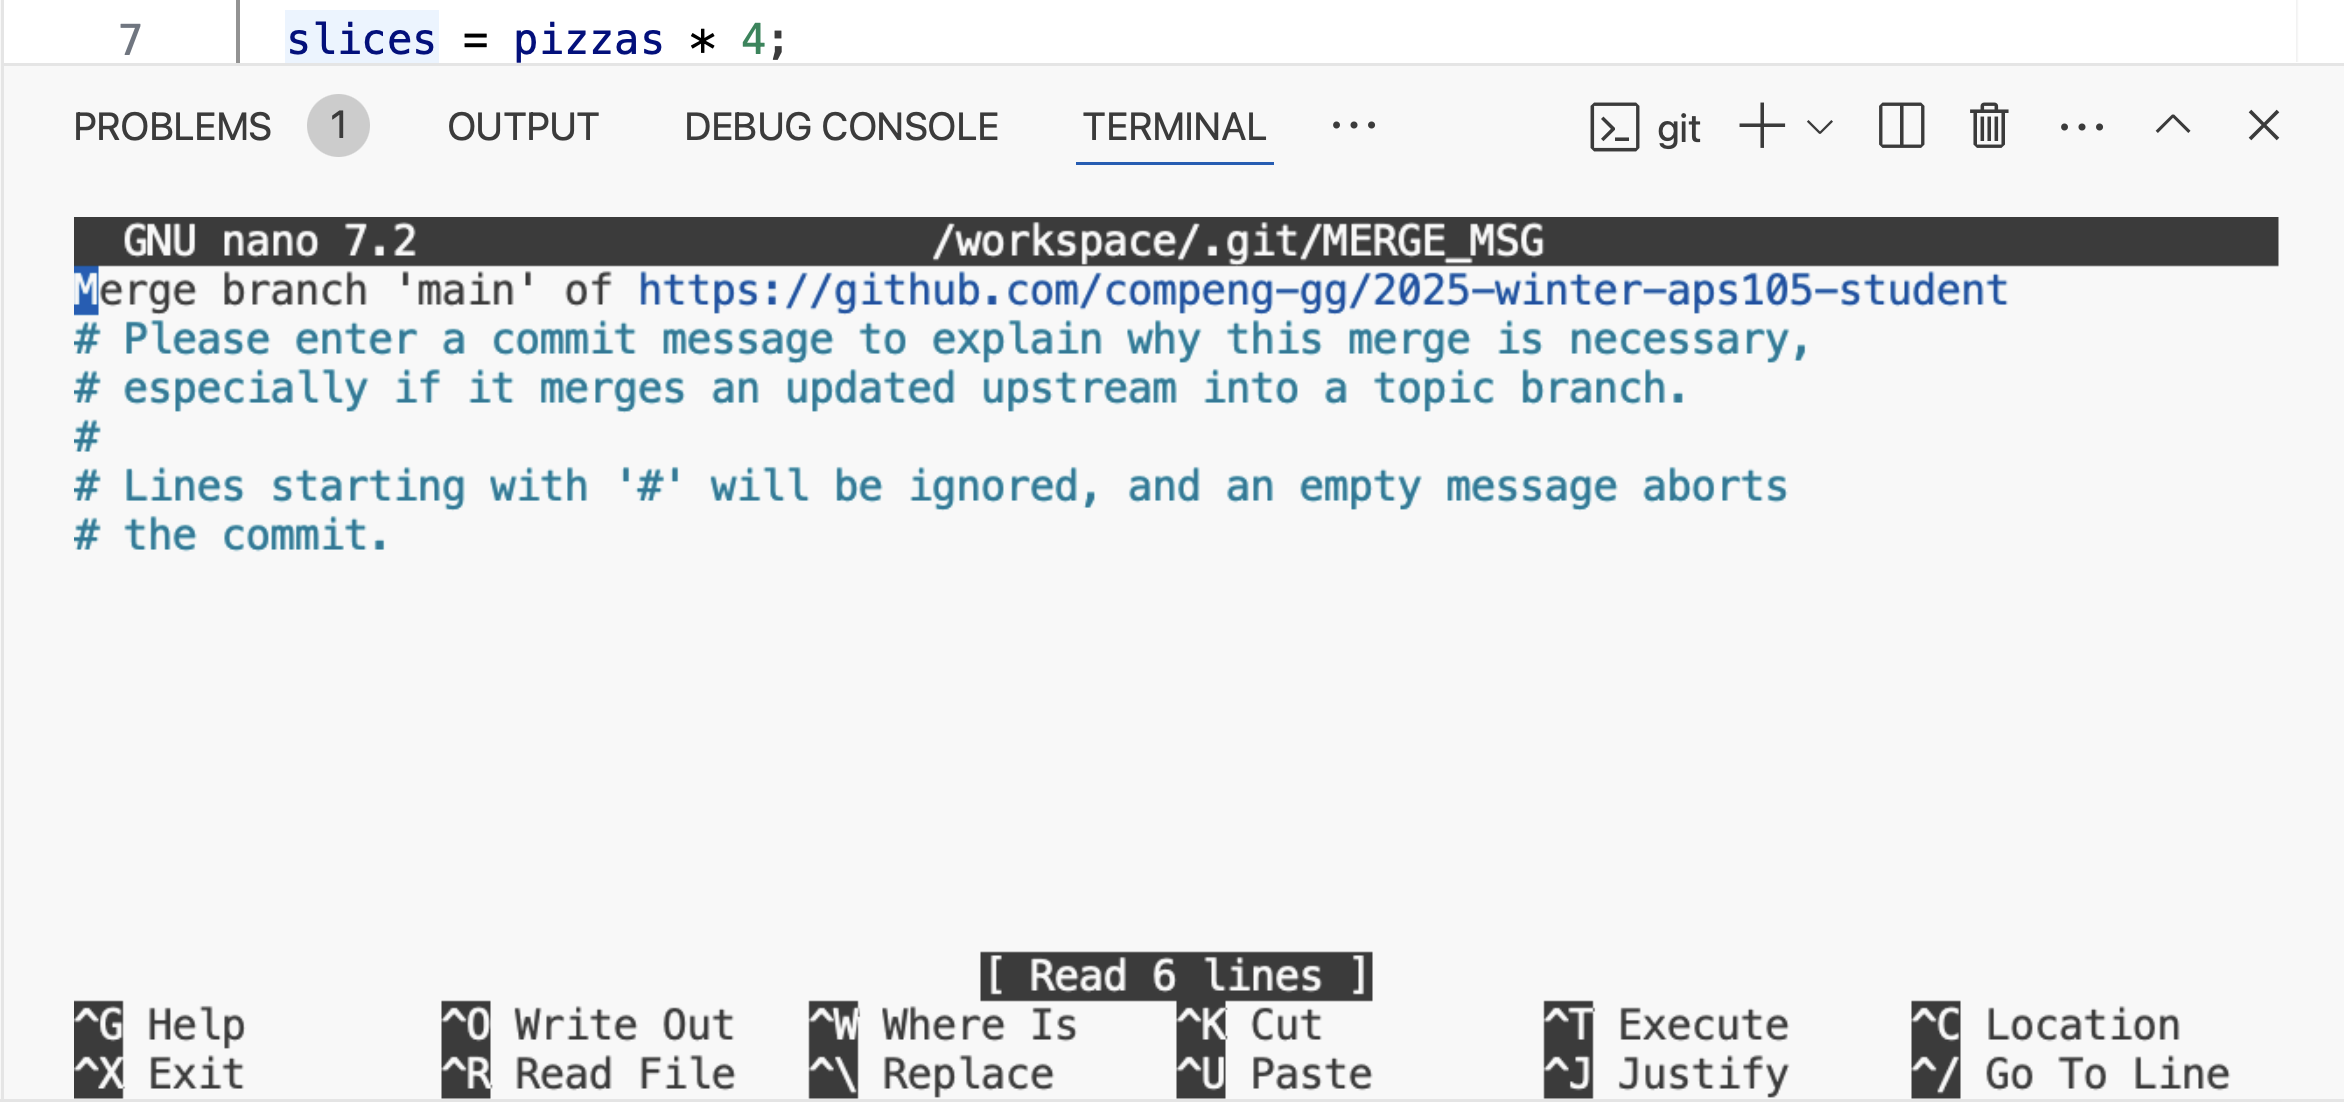 Fig.2 Merge pull messagenote
If you are using the Codespace please ignore these steps. For students NOT using the Codespace, first do:
git remote add upstream git@github.com:compeng-gg/2025-winter-aps105-student.gitYou only need to do this once, then after you'll use:
git pullThis command gets the starter code for the lab.
Description
In this assignment, you will create a simulation of a Elementary Cellular Automaton, such as the famous Rule 30 automaton. The automaton operates on a fixed row of 21 cells, each of which can be in one of two states: 0 (dead) or 1 (alive). Over multiple generations, the cells update based on specific rules.
The state of each cell in the next generation is determined by its current state and the states of its immediate neighbors (left and right) according to a specific rule. The automaton applies a specific rule to these three cells to determine the next state of the current cell. The same rule is applied for each cell in the array for every new generation.
It starts with a row of 21 cells with only one alive cell at a given index. Every new generation is computed based on three adjacent cells: the current cell and its two neighbors. The new state of the current cell is determined by the rule, which is an 8-bit binary number (0 to 255). The rule specifies the new state of the center cell based on the states of the left, center, and right cells.
Some research explores using ECA to generate pseudorandom numbers for cryptographic applications, leveraging their deterministic but seemingly random behavior. The most famous ECA is Rule 30, which is known for its chaotic behavior and is often used as a random number generator.
Rules Overview
In this assignment, you will implement and experiment with Elementary Cellular Automaton Rules, which govern the behavior of the automaton. These rules define how the state of each cell evolves based on its current state and the states of its immediate neighbors.
What Are Cellular Automaton Rules?
The rules are encoded as an 8-bit binary number. Each bit represents the new state of a cell given a particular configuration of the cell and its neighbors. In the following table, we show the binary representation specifying combinations of left (L), center (C), and right (R) cell state, and the corresponding new state for the center cell:
| Left (L) | Center (C) | Right (R) | Rule Index | New State |
|---|---|---|---|---|
| 1 | 1 | 1 | 7 | b7 |
| 1 | 1 | 0 | 6 | b6 |
| 1 | 0 | 1 | 5 | b5 |
| 1 | 0 | 0 | 4 | b4 |
| 0 | 1 | 1 | 3 | b3 |
| 0 | 1 | 0 | 2 | b2 |
| 0 | 0 | 1 | 1 | b1 |
| 0 | 0 | 0 | 0 | b0 |
The new state column showing , , , ..., is an 8-bit binary number corresponds to a decimal value (0 to 255), which defines the specific rule.
Rule Example: Rule 30
- Decimal representation of the rule: 30
- Binary representation of 30: 00011110
- (highest significant bit) = 0, = 0, = 0, = 1, = 1, = 1, = 1, (lowest significant bit) = 0
- New state mapping (LCR -> ) assigns the highest significant bit () to the LCR triplet (111) equivalent to 7 in decimal and the lowest significant bit () to the rightmost triplet (000) equivalent to 0 in decimal. For example, for Rule 30:
111 -> b7 = 0, which means that if the left, center, and right cells are all alive, the center cell becomes dead (0) in the next generation.110 -> b6 = 0, which means that if the left and center cells are alive, but the right cell is dead, the center cell becomes dead (0) in the next generation.101 -> b5 = 0which means that if the left and right cell are alive, but the center cell is dead, the center cell becomes dead (0) in the next generation.100 -> b4 = 1, which means that if the left cell is alive and the center and right cells are dead, the center cell becomes alive (1) in the next generation.011 -> b3 = 1, which means that if the center and right cells are alive, but the left cell is dead, the center cell becomes alive (1) in the next generation.010 -> b2 = 1, which means that if the center cell is alive, but the left and right cells are dead, the center cell becomes alive (1) in the next generation.001 -> b1 = 1, which means that if the right cell is alive, but the left and center cells are dead, the center cell becomes alive (1) in the next generation.000 -> b0 = 0, which means that if all cells are dead, the center cell becomes dead (0) in the next generation.
This is how Rule 30 works. The same logic applies to other rules, but the binary representation of the rule () determines the new state of the center cell based on the states of its neighbors.
How the Rules Work
For each cell in the array:
- Identify its left, center, and right values. For cells on the boundaries, use the specified boundary condition discussed in next subsection (e.g., cyclic or fixed).
- Match the triplet (
LCR) with one of the 8 possible patterns. - Use the corresponding bit in the rule's binary representation to determine the cell's next state.
Boundary Conditions
Boundary conditions define how the automaton handles cells at the edges of the array. Two common approaches are:
-
Fixed Boundary:
- Treat cells beyond the edges as permanently
0. - Example: For a 21-cell array, neighbors of the first cell are
(0, current[0], current[1]).
- Treat cells beyond the edges as permanently
-
Cyclic Boundary:
- Treat the array as circular, so the first cell's left neighbor is the last cell, and the last cell's right neighbor is the first cell.
- Example: For a 21-cell array, neighbors of the first cell are
(current[20], current[0], current[1]).
In this assignment, you will be using the cyclic boundary condition.
Additional Resources
Input Format
Your program will prompt the user Enter input: take three integers as input, separated by spaces. These integers define the initial setup and parameters for the simulation. The expected inputs are:
- Index of the Alive Cell: Specifies the index (0-based) of the cell that starts in the "alive" state (
1).- Example:
10means that the cell at index 10 starts as alive (1) in the 21 element array, while other elements are dead (0).
- Example:
- Rule Number: Specifies the rule to use for the simulation (a value between 0 and 255).
- Example:
30to simulate Rule 30, which we will need to convert to binary.
- Example:
- Number of Iterations: Specifies how many generations of the automaton should be computed and displayed.
- Example:
15for printing 15 generations on 15 lines.
- Example:
Note
The size of the array is fixed at 21 cells.
Example Input
10 30 20
- Alive Cell Index: Cell at index 10 starts as alive
- Rule: Rule 30
- Iterations: 20 generations
Suggested Functions
You are free to define and use any functions in your code. Just don't use the math library functions. We suggest implementing the following four functions to structure your program effectively.
1. void printArray(int array[]);
This function prints the array of cells, where each cell is represented by an asterisk (*) if it is alive (1) and a blank space if it is dead (0). The size of the array is known to be 21. You can define a MACRO #define ARRAY_SIZE 21.
Important: The automarker compares the output of your program, including sapces, with the output of the solution, and it should match the output exactly. Make sure to print 21 characters every time you call printArray, either a * or a blank space.
2. void initializeArray(int aliveIndex, int array[]);
This function initializes an array of a known size (21) with all elements set to 0, except for the position aliveIndex, which is set to 1.
After implementing this function, please test it by calling it in the main function and printing the array before you move ahead.
3. int getRuleOutcome(int rule, int left, int center, int right);
This function determines the next state of a cell based on its three neighbors and a given rule. The values of left, right and center are either 0 or 1, and the rule is an integer between 0 and 255. You need to get the binary representation of rule, and use the decimal number of LCR to get the appropriate bit from the binary representation of the rule. For example, if the decimal of LCR is 7, then the next state of the center cell is or the 8th bit of the rule. The function returns the new state of the center cell, which is either 0 or 1 based on the rule.
To convert the binary of left, center and right (LCR) to decimal, you can use the following code snippet:
int decimal = left * 4 + center * 2 + right;
Also, to convert the rule to binary, you can use the following code snippet:
int bin[8] = {0};
for(int i = 0; i <= 7; i++){
   bin[i] = rule % 2;
   rule /= 2;
}
The least significant bit is bin[0] and the most significant bit is bin[7].
After implementing this function, please test it by calling it in the main function with some values and printing the value it returns before you move to implement the next function.
4. void calculateNextState(int currentArray[], int nextArray[], int rule);
This function receives the current states of cells in currentArray array, nextArray that will have the states of the next generation, and rule that has the rule. The function should loop over all cells in currentArray and for each cell gets the left, center and right computes the next generation of the cell using getRuleOutcome function. If the cell is at the edges of the array, use circular boundary conditions as defined before to know the left and right values.
Each cell's new state is determined by calling getRuleOutcome, and the result is stored in nextArray.
After implementing this function, please test it by calling it in the main function and printing the array before you move ahead.
5. void simulateGenerations(int iterations, int array[], int rule);
This function takes as input iterations that is the number of generations to print, array that is the initialized array and rule that governs the rule of updating the cells.
The function can have two arrays to track of the currentArray and nextArray that it will pass to calculateNextState function to get the next states of cells. The function should loop and call calculateNextState and print the generated array for iterations number of generations.
After implementing this function, you can now implement the main function to take the input from the user, initialize the array by calling initializeArray and running the simulation by calling simulateGenerations.
Sample Output
Please note that alive cells with value of '1' should be printed using an asterisk and dead cells should be printed as a blank space.
Here is an example output for the input 10 30 20. The shown 10 30 20 is input and is not printed. Again, note that each generation displays 1 as * and 0 as a blank space:
Enter input: 10 30 20
          *
         ***
        **  *
       ** ****
      **  *   *
     ** **** ***
    **  *    *  *
   ** ****  ******
  **  *   ***     *
 ** **** **  *   ***
**  *    * **** **  *
  ****  ** *    * ***
***   ***  **  ** *
*  * **  *** ***  ***
 *** * ***   *  ***
**   * *  * *****  *
* * ** **** *    ***
* * *  *    **  **
* * *****  ** *** * *
  * *    ***  *   * *
Here is another example output for the input 10 184 20. The shown 10 184 20 is input and is not printed.
Enter input: 10 184 20
          *
           *
            *
             *
              *
               *
                *
                 *
                  *
                   *
                    *
*
 *
  *
   *
    *
     *
      *
       *
        *
Testing and Submission
-
Create a new file called
lab5.cin thelab5folder. -
Edit your code in
lab5.c, compile it, and run it to produce the output shown above. You can use the handy buttons shown below.
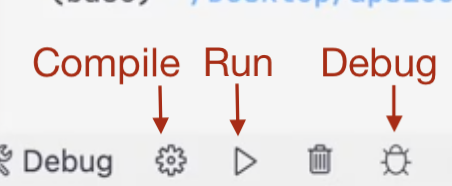
Fig.3 Handy buttons to compile, run, and debug your C program.
You also compile and run your program using the terminal, similarly to the previous assignments.
-
Once you have the correct output, go to the terminal and test your program against the test cases by typing the following commands:
cd /workspace/lab5
test
- If your program passes the test cases, you can submit your code by typing the following commands.
git add lab5.c
git commit -m "Lab 5"
git push
:::