Lab 8: Reversi Game-Playing Program
The goal of this lab is to build upon your work in Lab 7 to create a program that actually plays the Reversi game against a human opponent. There are two parts to this lab. In the first part, you are required to implement the specified algorithm to use for the computer moves. In the second part, you are free to make your own algorithm.
It is due March 29, 2025 at 11:59 PM.
Grades
This lab is worth 10 marks + 4 bonus marks. The breakdown is as follows:
- Part 1: Implementing the Prescribed Algorithm (6 marks: 4 public, 2 private)
- Part 2: Implementing Your Own Algorithm (6 marks: 4 test cases each worth 1.5 marks that you can test without
testcommand). - In-person: 2 marks for in-person lab marking.
You can always see your public test cases automarker grades here APS105 after every submission. They are out of 4.
The in-person lab marking is worth 2 marks, and will be marked by a TA in-person. You should go to your assigned lab section, your assigned TA and sit on your assigned workstation. You will find this information on Quercus under Lab Subsection. You must sit in your assigned seat for the TA to grade you. Otherwise, they will mistakenly think you are absent and give you a 0. The in-lab grading is due April 4, 2025 in your practical session. Your assigned TA will ask you questions about your code, and will look at your code to ensure the coding style is neat. For this lab, the coding style involves if you are having at least 5 functions in your program, indenting your code properly, if you are using proper variable names, if you are using proper comments, and if you are using proper spacing.
Instructions
-
Go to your GitHub repo from lab 0 by following this link:
https://github.com/compeng-gg/2025-winter-aps105-<UTORID>, where you'll have to replace<UTORID>with your UTORid. -
Open the same codespace you created for lab0. You should not create any other codespaces.
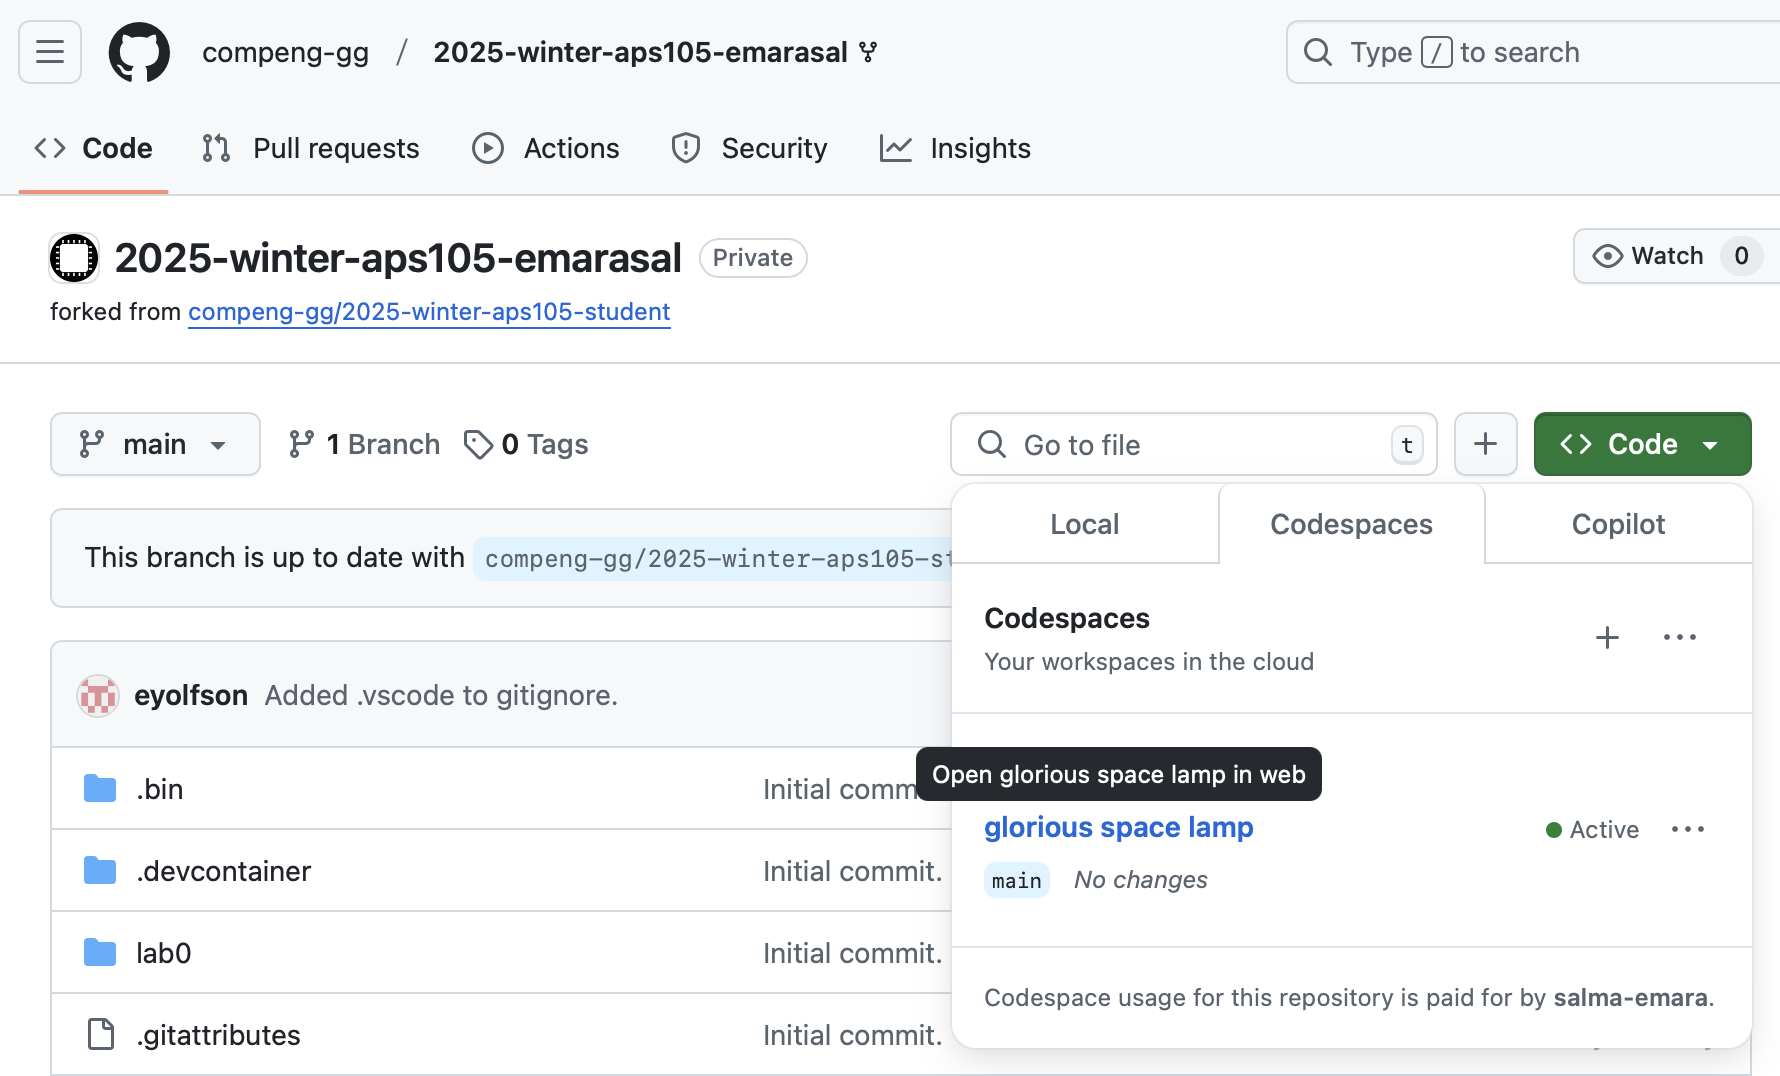 Fig.1 Existing codespace created in your GitHub repository
 -
In the terminal, type in the following command to transfer (pull) lab 8 material into your codespace:
pullThis will do a "pull" (which gets files from the "student" repository, containing starter code). This helper command will make sure you commit all your changes before you can start Lab 8. You should always commit (and push) your changes!
-
You should see a folder called lab8 in your repository.
Important! If you're using the Codespace to save the lecture notes, you'll get "You must commit all your changes (check
git status)". To resolve this, you may use the following command instead:git pull upstream mainIf you get the following error, please press on
Ctrl+Xfor Mac and Windows.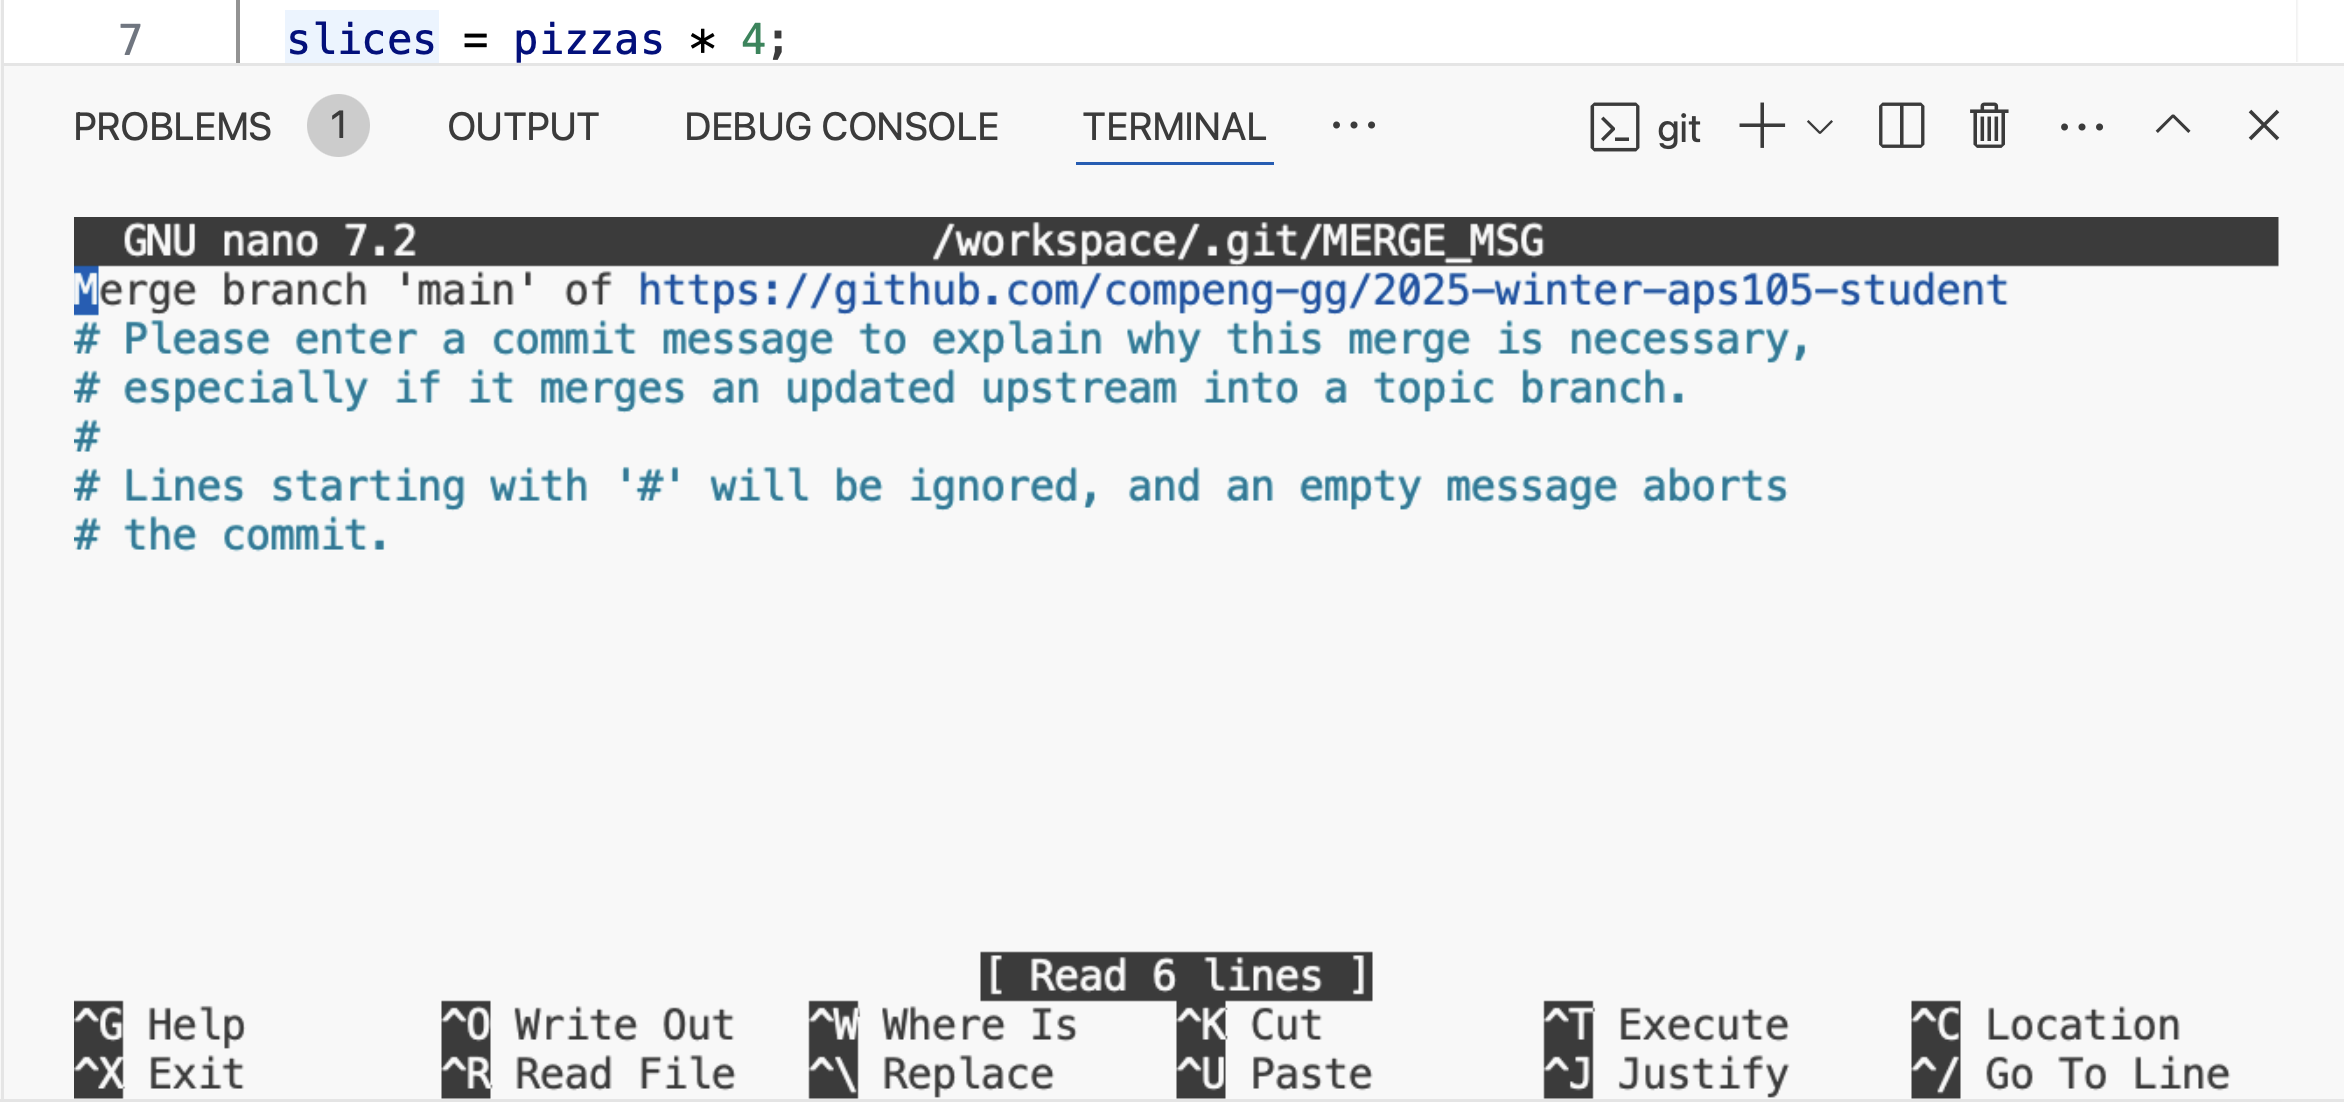 Fig.2 Merge pull messagenote
If you are using the Codespace please ignore these steps. For students NOT using the Codespace, first do:
git remote add upstream git@github.com:compeng-gg/2025-winter-aps105-student.gitYou only need to do this once, then after you'll use:
git pullThis command gets the starter code for the lab.
Objective
In Lab 7, you developed a program that represents the board of a Reversi game, and that computes, for a given board state, the possible moves for the Black and White player. Your solution also accepts a move as input and flips the tiles accordingly. In this lab, you will build upon your work to create a Reversi game where a human can play against the computer, with the computer making intelligent decisions about where to place its tiles.
Recap: The Rules of Reversi
The rules of the game were presented in the Lab 7 handout, and are briefly repeated here. Reversi is played on a board that has dimensions , where is even and ranges from 4 to 26. In the picture below . The game uses tiles that are white on one side, and black on the other side (they can be "flipped" over to change their color). One player plays white; the other player plays black. The picture below shows the initial board configuration, which has two white and two black tiles pre-placed in the centre. Observe that rows and columns are labelled with letters.
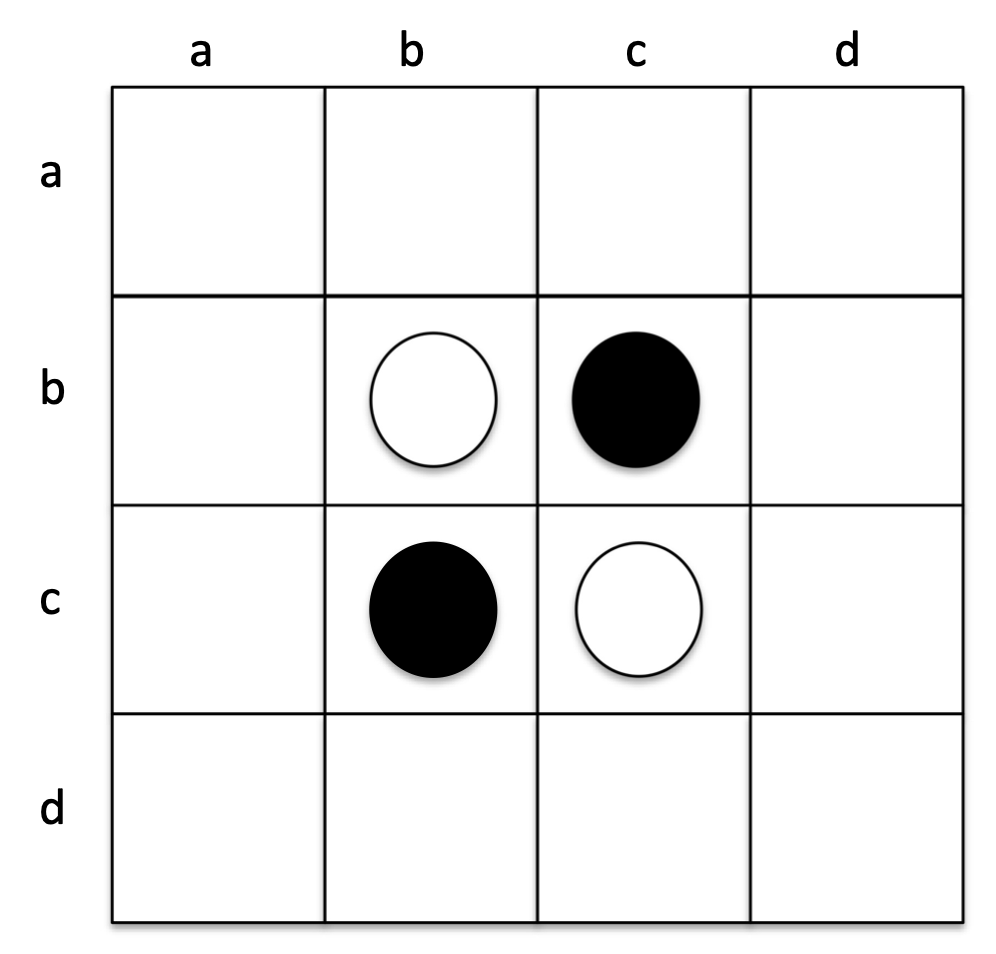 Fig.3 Starting positions on the Reversi game board.
A "turn" consists of a player laying a tile of his/her own color on a candidate empty board position, subject to the following two rules:
-
There must be a continuous straight line of tile(s) of the opponent's color in at least one of the eight directions from the candidate empty position (North, South, East, West, and diagonals).
-
In the position immediately following the continuous straight line mentioned in #1 above, a tile of the player's color must already be placed.
After playing a tile at a position that meets the criteria above, all of the lines of the opponent's tiles that meet the criteria above are flipped to the player's color.
The turns alternate between the players, unless one player has no available move, in which case the only player with an available move is allowed to continue to make moves until a move becomes available for the opponent. At this point, the opponent is allowed to take a turn and the alternating turns between the players resume. The game ends when either: (1) the entire board is full, or (2) neither player has an available move. The winner of the game is the one with more pieces on the board.
The Game Flow and Prescribed Algorithm
Your program must first ask the user for the board dimensions. Then, the program asks the user if the computer is to be the Black or White player. For this lab, we will assume that the Black player always gets the first move. So, if the computer is black, then the computer should make the first move; otherwise, the program prompts the human player to make the first move. The board is printed after every move.
Once the first move is out of the way, the turns proceed as described above, alternating between Black and White unless one of the players has no move to make, which case your program should print a message W player has no valid move. (i.e. for the case of the White player) and should prompt the Black player for another move. After each turn, your program must print the board, and must detect whether the game has been won, or whether there is a draw. If your program detects the game is over (i.e. a win or a draw), a message is printed and the program terminates. The specific messages to print are: W player wins., B player wins. or Draw!. If the human player makes an illegal move, your program must detect this, print an error message, and end the game, declaring the winner (with the corresponding message above).
Part 1: Implementing the Prescribed Algorithm
Setup Instructions
Please follow instructions closely! For part 1, you are asked to:
- Copy your file from lab 7
lab7.cinto the directory for lab 8lab8part1 - Rename
lab7.ctopart1.c. - Copy from
lab8part1/starter-codedirectorylab8part1.hintolab8part1. - In your now
part1.c, change the line#include "reversi.h"#include "lab8part1.h".
Don't edit lab8part1.h file or your program won't compile on CompEng.gg and you will get a 0.
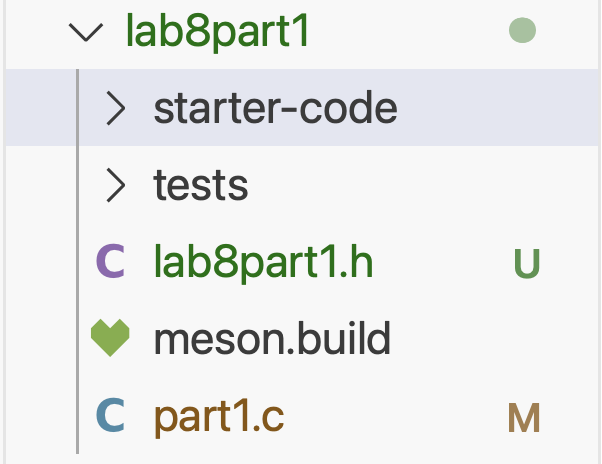
Fig.4 How your lab8part1 directory should look like.
You should now extend on your part1.c file with the algorithm described below.
How Should the Computer Make Moves?
The method for the computer to make a move is as follows: for each possible place it could make a move, it should compute a number, called a "score" that is larger when a square is a better place for the computer to lay a tile. As these scores are computed for each square, it should keep track of which one is the highest, and use that square as the move. (See below on what to do in the event of a tied score).
The score for each candidate position is defined as the total number of the human player's tiles that would be flipped if the computer were to lay a tile at that position. The figure below shows the scores if the computer were the White player.
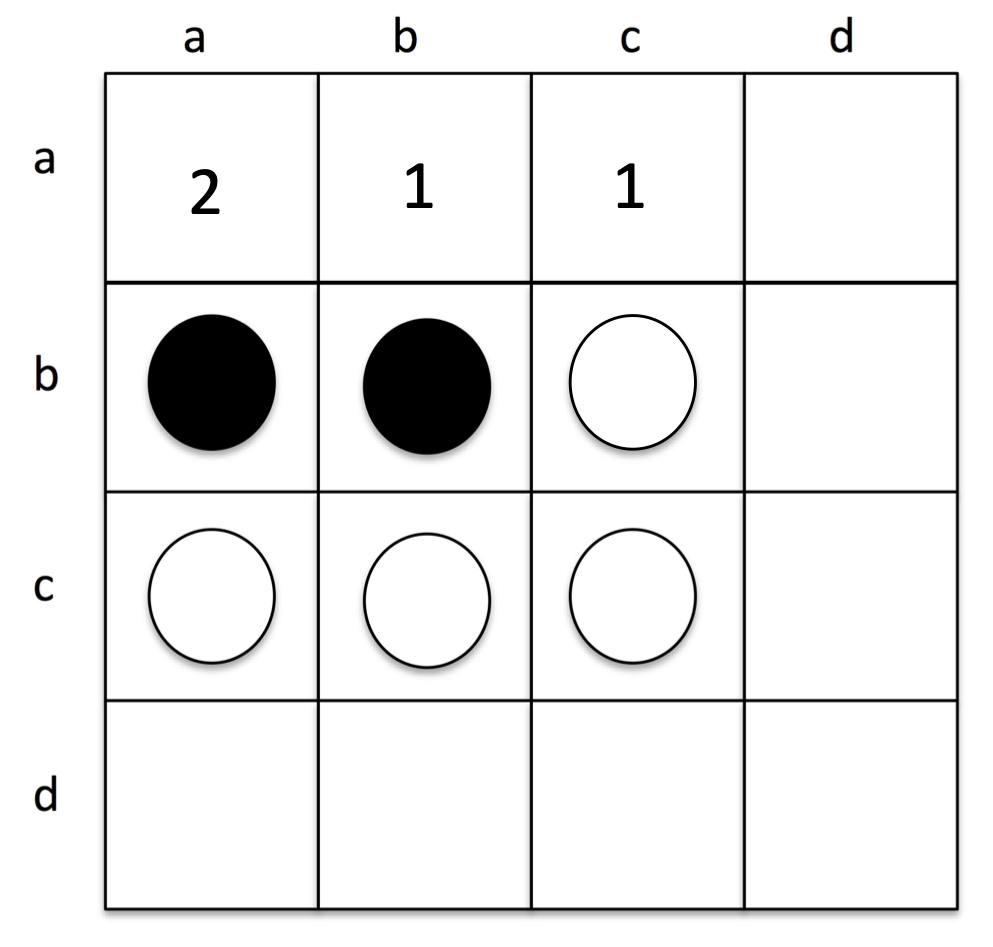 Fig.3 Scores for the White piece.
A few important notes:
-
It is likely that two or more squares may end up having the same score. In that case your program must choose the position with the lower row. If there are two positions with the same score in the same row, your program must choose the solution with the lower column. You can ensure this happens easily by the order in which you compute the score and test to see if it is the best.
-
Your program must be able to work with the computer being either the Black or the White piece.
Test case 1: Here is a sample execution of the program (your program must conform to this output). Notice that, close to the end, the computer (playing White) has no valid move, and the turn returns to the human player (playing Black).
Enter the board dimension: 4
Computer plays (B/W) : W
  abcd
a UUUU
b UWBU
c UBWU
d UUUU
Enter move for color B (RowCol): ba
  abcd
a UUUU
b BBBU
c UBWU
d UUUU
Computer places W at aa.
  abcd
a WUUU
b BWBU
c UBWU
d UUUU
Enter move for color B (RowCol): ab
  abcd
a WBUU
b BBBU
c UBWU
d UUUU
Computer places W at ac.
  abcd
a WWWU
b BBWU
c UBWU
d UUUU
Enter move for color B (RowCol): bd
  abcd
a WWWU
b BBBB
c UBWU
d UUUU
Computer places W at ca.
  abcd
a WWWU
b WWBB
c WWWU
d UUUU
Enter move for color B (RowCol): da
  abcd
a WWWU
b WWBB
c WBWU
d BUUU
Computer places W at cd.
  abcd
a WWWU
b WWWB
c WBWW
d BUUU
Enter move for color B (RowCol): dd
  abcd
a WWWU
b WWWB
c WBWB
d BUUB
Computer places W at db.
  abcd
a WWWU
b WWWB
c WWWB
d BWUB
Enter move for color B (RowCol): dc
  abcd
a WWWU
b WWWB
c WWWB
d BBBB
W player has no valid move.
Enter move for color B (RowCol): ad
  abcd
a WWWB
b WWBB
c WBWB
d BBBB
B player wins.
Test case 2: Here is another sample execution where the human player makes an illegal move and the computer wins.
Enter the board dimension: 6
Computer plays (B/W) : B
  abcdef
a UUUUUU
b UUUUUU
c UUWBUU
d UUBWUU
e UUUUUU
f UUUUUU
Computer places B at bc.
  abcdef
a UUUUUU
b UUBUUU
c UUBBUU
d UUBWUU
e UUUUUU
f UUUUUU
Enter move for color W (RowCol): fa
Invalid move.
B player wins.
Testing and Submission
-
Make sure your code is in a file called
part1.cin thelab8part1folder. -
Compile your code, and run it to produce the output shown above. You can use the handy buttons shown below.
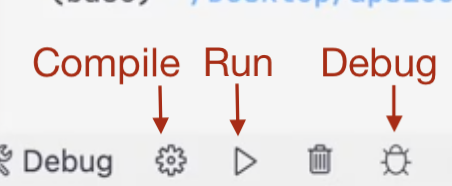
Fig.3 Handy buttons to compile, run, and debug your C program.
You also compile using the terminal using
compilecommand, and run usingmeson-build/part1command. You shouldcd /workspace/lab8part1before running these commands. -
Once you have the correct output, go to the terminal and test your program against the test cases by typing the following commands:
cd /workspace/lab8part1
test
-
Common Issue. Many students find it difficult to notice differences between their output and the expected output. If you are having trouble,
- View inputs of a test case, e.g., if you failed test case 1 in lab 8 part 1, you can view the input by opening
lab8part1/test/public/inputs/part1-1file. - View outputs of a test case, e.g., the output of the test case is in
lab8part1/test/public/outputs/part1-1file. - Use the
compilecommand to compile your program. - To get the output of test case 1, use
meson-build/part1 < tests/public/inputs/part1-1command. This will produce the output of test case 1, that has inputs intests/public/inputs/part1-1file. - Copy the output of your program and the output in
tests/public/outputs/part1-1 - Open CheckDiff, paste the two outputs in respective boxes, and click on
Find difference. This will highlight the differences between the two outputs.
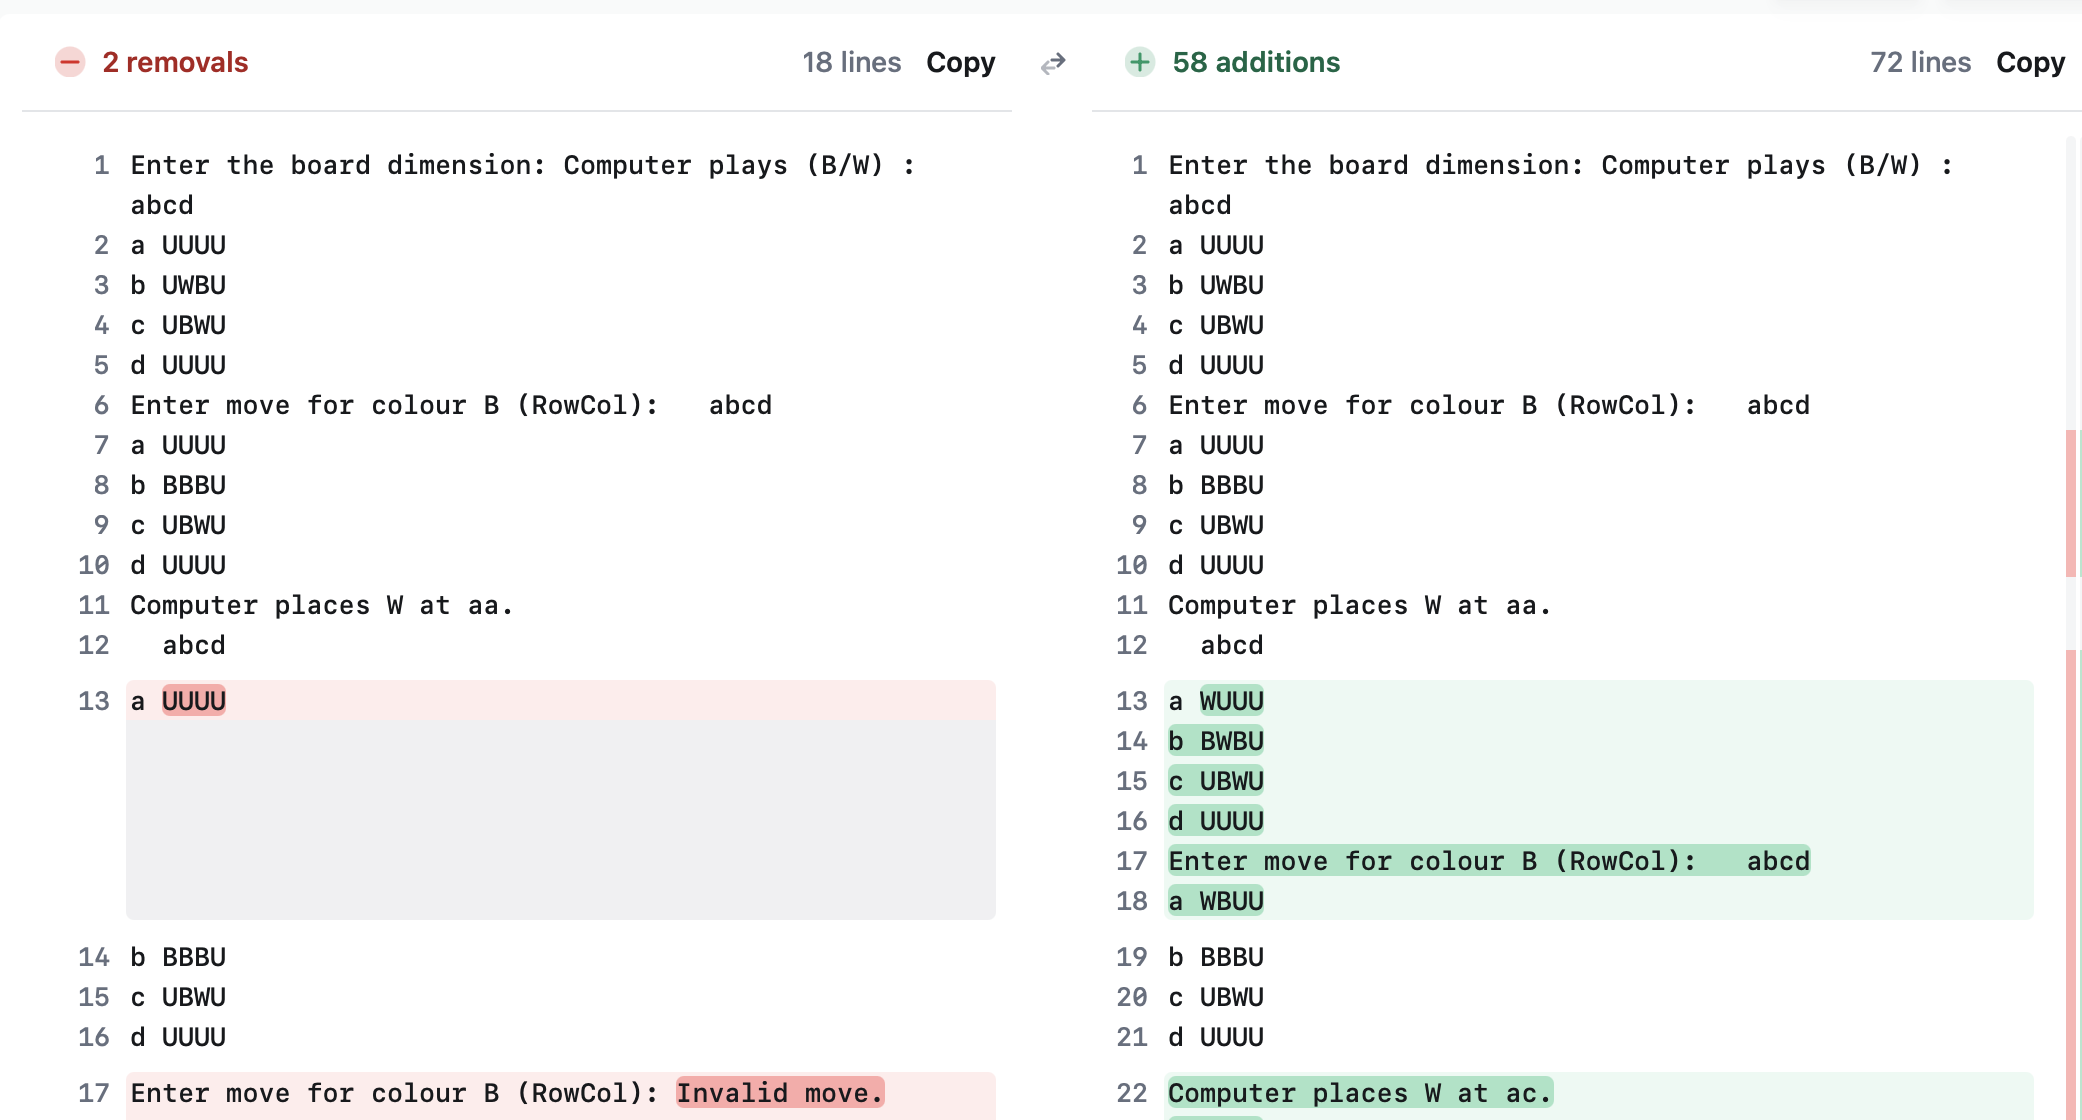
Fig.5 Output of Check Diff Site.
- View inputs of a test case, e.g., if you failed test case 1 in lab 8 part 1, you can view the input by opening
-
If your program passes the public test cases, you can submit your code by typing the following commands.
git add part1.c
git commit -m "Lab 8: Part 1"
git push
You won't be able to see your grade after pushing this part. If you want to, you need to setup part 2 for part2.c as detailed in the next section setup instructions.
Part 2: Implementing Your Own Algorithm
Setup Instructions
Please follow these instructions closely! For part 2, you are asked to:
- Copy your
part1.cfromlab8part1and paste it intolab8part2directory - Rename it from
part1.cpart2.cin thelab8part2directory. - Under
lab8part2directory copy fromstarter-code:lab8part2.h,liblab8part2.h,liblab8part2.afromlibraries/<OS of your computer>. If you are on GitHub Codespaces, use Linux (64-bit) version, copy from fromlibraries/
- Change
#include "lab8part1.h"#include "lab8part2.h"in yourpart2.cfile. - Add the following line
#include "liblab8part2.h"to the top of yourpart2.cas well. This will help you in testing.
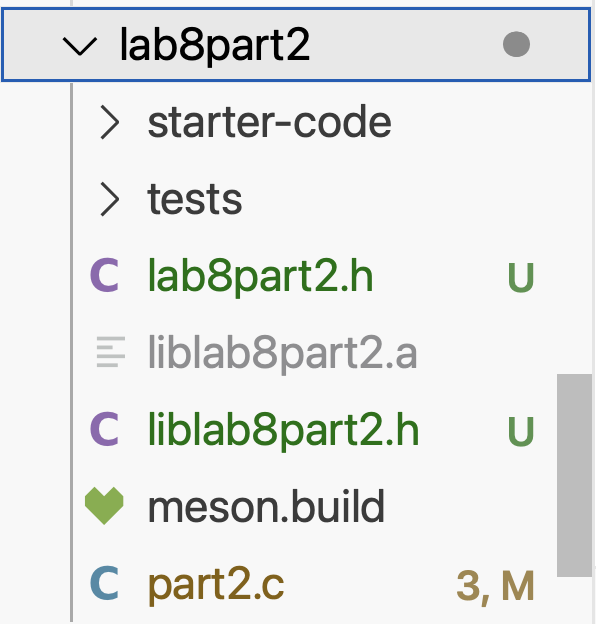
Fig.4 How your lab8part2 directory should look like.
- You will implement a function named
makeMovein this part. You should copy the prototype ofmakeMovefromlab8part2.hfile intopart2.cfile and remove the ; and replace it with{}as follows:int makeMove(const char board[][26], int n, char turn, int *row, int *col) {} - For the lab to be graded, your
part2.cfile should not have amainfunction. We will add one for you on CompEng.gg. You should comment out the main function from thepart2.cfile before adding,committing and pushing. Don't delete themainas you will need it for testing your code. - To check if your lab 1 has passed test cases on CompEng.gg, please submit part 2 by typing the following commands.
cd workspace/lab8part2
git add part2.c
git commit -m "Lab 8: Part 2"
git push
If you followed steps correctly, you should see your grade for part 1 on CompEng.gg.
Note: You cannot compile your code in this part using thecompile command. You cannot test it using the test command. Instructions on compiling and testing are detailed in the Testing section below.
How to Implement Your Own Algorithm?
You can bring back your mainfunction for testing, but comment it out when submitting. In this part of the lab, your objective is to apply your wits, creativity and resourcefulness to produce the best computer player possible, using any approach you are aware or can think of. For example, you may wish to consider using an approach that looks ahead some number of moves. There is, however, a time limit on how much computer time will be allowed per move.
Here are the requirements for your program in Part 2:
- In order for your program to be tested using the test cases, your own algorithm should start from calling the function
makeMove(), the prototype of which is shown below. You can, of course, call other functions that you prefer to define within thepart2.cfile.
int makeMove(const char board[][26], int n, char turn, int *row, int *col);
This function takes five parameters --- the game board, the dimension of the board, the color of the next move (who should take the turn, Black or White?), and two pointers to two integer values --- and computes the best move for that color. You should not update the board within this function --- the parameter has a const keyword indicating that you should not modify anything stored in the board array. The location of the best move should be returned to the calling program using the two pointer variables, row and col, to two integer values. The function returns an int type value as well, and it is up to you on what it would return. If you have no useful information that needs to be returned, you may simply return 0.
-
For an board, your program must make a move (lay a tile) within one second on
CompEng.gg. If your program does not make a move within one second, it will be considered an invalid move. Please refer to Appendix B in this handout for some additional information on how to measure the execution time of your moves. -
If your program makes an invalid move, it will immediately lose the game (as in Part 1 of this handout).
Note that the input and output formats of this part are identical to Part 1. The only difference is that your program may use any algorithm to choose the moves made by the computer.
Testing
You can bring back your mainfunction for testing, but comment it out when submitting.
In part2.c file, you will implement a computer AI strategy to play the Reversi game in makeMove() function. To help you test the strength of your AI, we provide you with both the "smarter" AI and the "even smarter" AI strategies in a static library file called liblab8part2.a. This tutorial helps you to use this library file to test the strength of your AI before submitting your solution.
Your original solution in Lab 8 Part 1 in part1.c should have two lines of code that uses printf() and scanf() to prompt a human player to enter his/her move. To set up your program for testing using liblab8part2.a, replace these two lines of code with something similar to the following:
findSmarterMove(board, n, color, &row, &col);
printf("Testing AI move (row, col): %c%c\n", row + 'a', col + 'a');
findSmarterMove will use the "smarter" AI strategy to find the best move. If you wish to use the "even smarter" AI, call the findSmartestMove function with the same parameters. Note here that row and col are integers.
In order to build your project successfully using the handy buttons at the bottom, you need to modify some compiler and linker settings in the setting.json file under the .vscode folder.
{
  "C_Cpp_Runner.cCompilerPath": "...",
  ...
  "C_Cpp_Runner.compilerArgs": [],
  "C_Cpp_Runner.linkerArgs": [],
  ...
}
Update the field in "C_Cpp_Runner.compilerArgs" and "C_Cpp_Runner.linkerArgs" to reflect the absolute path to the liblab8part2.a library.
Here is an example for macOS and Linux:
{
  ...
  "C_Cpp_Runner.compilerArgs": [
    "${workspaceFolder}/lab8part2/liblab8part2.a"
  ],
  "C_Cpp_Runner.linkerArgs": [
    "${workspaceFolder}/lab8part2/liblab8part2.a"
  ],
  ...
}
Alternatively, you can compile and run your program directly in the terminal (for example, PowerShell in Windows or Terminal in macOS and Linux or in Visual Studio Code's built-in Terminal). Change to the working directory to where the project is stored at, and run one of the following command depending on your operating system ---
gcc part2.c -L. -llab8part2 -std=c99 -o lab8part2
You can then run the executable that you have just built ---
./lab8part2
You are now ready to test your solution to your heart's content. There is no test command for this part. You can test your program by running it and observing the output. You can also test your program by playing against the "smarter" and "smartest" AI strategies.
Part 2 will be marked by playing your game-playing program against two game-playing Reversi programs, developed by the APS105 course staff: a first which is just slightly "smarter" than the Part 1 solution, and a second that is a little bit smarter than the first. Both programs will be identical to the library we provided to you for testing your work. Your program will be played against the two staff-developed programs twice in an board on ECF: in one instance your program will play Black, and in the second instance your program will play White. If your program is able to win one of the instances against our "smarter" program, you will receive 1.5 mark. If your program is able to win one of the instances against our "smartest" program, you will receive 1.5 additional marks. You will get a total of 6 marks if your program is able to win both instances against the "smarter" program and the "smartest" program.
Currently, CompEng.gg doesn't show if you are winning against smarter and smartest. We will update you if we can change that.Now, CompEng.gg will show you if you win against smarter in test cases part2-1 and part2-2, and smartest in test cases part2-3 and part2-4.
Submission
You must comment out your main function in part2.c when submitting. You should not be using findSmarter and findSmartest in your submitted code. To submit your code, you need to commit and push your code to your GitHub repository. You can do this by typing the following commands in the terminal:
cd /workspace/lab8part2
git add part2.c
git commit -m "Lab 8: Part 2"
git push
Part 3: Leaderboard --- Optional
This part is optional if you want to participate in the leaderboard.
- Create a new directory named
lab8part3underworkspace. - Copy
part2.cfromlab8part2directory into the directory namedlab8part3. - Copy
lab8part2.hfromlab8part2into the directory namedlab8part3. - Rename
part2.ctolab8part3.c. - In
lab8part3.c, you should have themainfunction there uncommented.
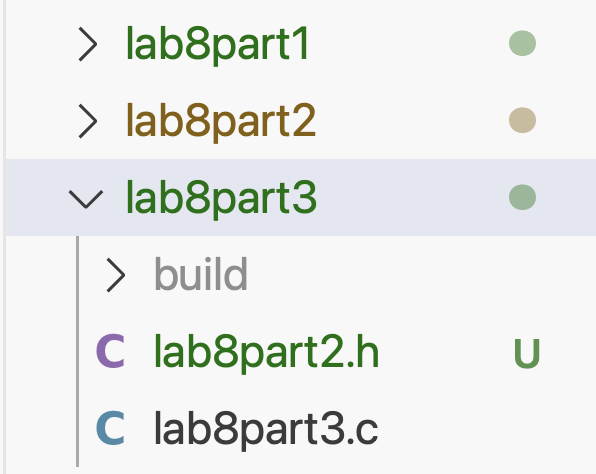
Fig.4 How your lab8part3 directory should look like.
Submission
You have your main function in lab8part3.c when submitting. To submit your code, you need to commit and push your code to your GitHub repository. You can do this by typing the following commands in the terminal:
cd /workspace/lab8part3
git add lab8part3.c
git commit -m "Lab 8: Part 3"
git push
Appendix A: Participating in the Online Interactive Leaderboard
As an optional added challenge, the APS 105 teaching staff developed an online interactive leaderboard website located at https://www.eecg.utoronto.ca/~salma/teaching/aps105/index.html.
After you submit your program for Part 3 to GitHub, your algorithm will be considered in the online interactive leaderboard automatically. All your moves should be completed within one second on ECF remote server.
The leaderboard will be updated continuously, reflecting the latest status of all the submissions we received. It can take up to one day to update.
Top 10 students in the APS 105 Competition Leaderboard will be rewarded with certificates that you can include in your resume.
Our leaderboard system is designed to periodically compile and run your submitted code for Lab 8 part 3. If your solution is able to beat findSmarterMove() (called aps105-smarter on the leaderboard) and findSmartestMove() (called aps105-smartest) with both white and black colors for three out of four games, you will be part of the finalists on the leaderboard. The finalists are played against each other in pairs, and their total scores will be ranked and presented in the leaderboard. Between each pair of finalist players, two games will be played, so that each player will have a chance to play black.
The scores for a player are computed using the following rules. A game won will earn a score of 2, and a game lost will earn a score of 0. A tie will earn a score that is between 0 and 1, depending on the amount of time a player used, as a fraction of the total time for both players.
To participate in the competition, all you need to do is to submit your solution for Lab 8 Part 3. You can submit as many times as you wish, and your latest submission is used to participate in the competition.
Initially, the leaderboard contains three players: one entry from the best student solution in Winter 2017, the findSmartestMove algorithm (called aps105-smartest), and mine (called emarasal) that is there for testing purposes. You can download the detailed logs on how games are played to compute the scores on the leaderboard.
Appendix B: Measuring the Passage of Time in your Program
If you create an algorithm that searches through a sufficiently large number of choices for moves, it may use more than the allowed one second time limit. There are at least two ways to deal with this:
- Write an algorithm that you are certain will never use more than a second on an board, by testing it and measuring it on the slowest test cases.
- Have your program check the elapsed time while it is running, and stop searching for the next move, when it gets close to the time limit. Here it should use the best choice found to that point. To do this, you will need to make use of the following code, which shows how to measure time:
At the top of your C program, add these two lines:
#include <sys/time.h>
#include <sys/resource.h>
Then, to time part of your program, use the code as below. It consists of two calls to functions that returns the current time in seconds and microseconds. The code below produces a value, in the variable total_time in seconds.
struct rusage usage; // a structure to hold "resource usage" (including time)
struct timeval start, end; // will hold the start and end times

getrusage(RUSAGE_SELF, &usage);
start = usage.ru_utime;
double timeStart = start.tv_sec +
                   start.tv_usec / 1000000.0; // in seconds

// PLACE THE CODE YOU WISH TO TIME HERE

getrusage(RUSAGE_SELF, &usage);
end = usage.ru_utime;
double timeEnd = end.tv_sec +
                 end.tv_usec / 1000000.0; // in seconds

double totalTime = timeEnd - timeStart;

// totalTime now holds the time (in seconds) it takes to run your code